We got talking about ChatGPT yesterday at work and surprisingly, none of us have really been asked by teachers to block it from students. It could be because they haven't heard about it yet or because we're in final exam week and students aren't doing a whole lot of work aside from wrapping up for the semester.
Feelings among the coaches were mixed. We understand the anxiety that comes from the publicity that ChatGPT has drummed up and for some of the examples we've tried out. At the same time, if you actually try using it yourself (requires a login), you'll quickly discover that it isn't as scary as it sounds.
A tool is a tool
At the end of the day, ChatGPT is a computer program which takes in a question and gives back a human-ish response. You can ask about anything (for the most part - it couldn't tell me about myself even though I'm on The Internet) and the site will give you a response summarizing the thing. The summaries were okay and, I will admit, the code samples were cool to see created on the fly.
But here's the thing - it's a summary machine. It gives these responses based on information it has already been given. If you're a teacher or student looking for an interactive method for summarizing information, this is a great tool because it can take natural language prompts ("Tell me about the solar system") and provide information quickly.
Finding teachable moments
If you're not looking for summaries and are more concerned about students making less-than-genuine submissions to your assignments, don't lose any sleep. The responses from the machine are very dry and are easy to spot. If you're taking time to actually read what's coming in, you'll be fine.
For other, less subjective submissions, here are some ways you can use ChatGPT to push your assignments up toward Synthesis and away from Knowledge on the Bloom's spectrum:
ELA
Since it's a summary machine, consider generating a summary via ChatGPT on your own and then use the response as a close-read and editing activity with your students.
Is the summary factually correct?
Is there extra, unnecessary information that can be removed?
Is there context that should be added?
I also gave it a short prompt to write a story and it gave back a passable response. It was creative in the sense that it followed the prompt ("Write a story about a penguin named Sparky who moves to the rainforest.") and gave a story with a start, middle, and end. If your students do this, here are some questions to ask:
Who owns a story once it's written? The person with the idea or the writer?
Can this be edited to have a better story arc?
Is the resolution satisfying? What makes a satisfying resolution?
STEM
One of the big breakthroughs with this model is the ability to generate code samples on the fly. Learning to code can be frustrating because we might not always have the mental model to do what we need to do. Giving ChatGPT a prompt like, "Write a program which generates random odd numbers in python" will give you a working program. Use this as a starting point:
Is this the best way to accomplish that task?
Can you refactor it into something more concise?
How would this type of program be useful?
If you work for a company and you use code from ChatGPT, who owns it?
Math
Wolfram Alpha has had an equation solver for a while, but this goes a little further because you can ask ChatGPT to validate a proof or equation. I tried giving it a proof that "proves" 1 = 0 by including a subtle logical fallacy. The machine tells me it isn't valid, but it does a poor job of explaining why.
Provide students an explanation of what is happening (created by ChatGPT) and then improve it.
Give students a challenge and ask them to validate their responses using the AI.
How could using AI to evaluate mathematics change the way we think about math?
Social Studies
I asked ChatGPT, "How does the geography of the United States contribute to its political climate?" to see how well it could synthesize a response. It give me a five-paragraph essay which kind of danced around a coherent answer, but failed to really make a solid point.
Have students generate a response and then use that information to defend a position they hold in a debate.
Provide students with a summary and use it to research other contributing factors.
Create quick summaries of historical figures to reference in discussions.
World Language
I'm not going to lie, this one was cool. Google Translate already exists and we know students use it. ChatGPT differs in that I could prompt it for regional dialect and formal vs informal responses. It will event provide phonetic responses if requested.
Quickly generate prompts for students to translate or to analyze in class (less work on you)
Compare and contrast different methods for translating a piece of text
Summarize rules for translation for reference
What do we really want to teach?
ChatGPT is a summary machine. It can be used as a way to quickly get information to use as a starting point, and that's the key. It does not cite these sources, and that's where the teaching comes in. Evaluation and synthesis are the next steps to actually do something with what we know. This is an emerging tool and we don't know what wider impact it will have in the future. For now, I would recommend thinking deeply on what I want to teach and how a powerful source of summaries could be used.
Don't forget that it is still susceptible to errors. Even a calculator will always give an answer, but that doesn't mean it is the correct one. Teach students to develop critical habits and to check what they're given to make sure it's factually correct. Train them to look for errors by inviting them to challenge ideas and ask questions.
ChatGPT is impressive and AI is only going to become more impressive. Take some time to think about implications of the tools as it relates to teaching practice. What kinds of questions are worth asking?
This is a story about one of those life events that seems routine that turns upside down real quick.
The Red Ranger herself
It started as a routine clutch replacement. Mine started rattling a little while idling, so I decided to go ahead and change it before it gave out entirely. This is the third or fourth clutch I've done, so I wasn't worried about it and went into the weekend expecting to take at least a full day of work, maybe a couple hours into the next.
All was going well until we started to remove the transmission. My brother in law was under the car and I heard a low, "Oh dear." That's when the adventure started.
You should not be able to see those bolt threads.
The casing where the transmission mounts to the body of the car had broken at some point. This is a Bad Thing to Happen because if the one remaining bolt had broken, the entire engine and transmission of the car could have rotated backwards and essentially torn itself apart.
There are two options in this situation: replace the car or replace the transmission. The benefit of replacing the transmission is that it is much less expensive than replacing the car, so we went for that option. And that's where another snag popped up.
My car is sort of a chimera. The original transmission (5-speed manual) is well known for a bad bearing, which causes catastrophic failure. So, mine has a 6-speed, replaced by the previous owner. It's a more robust transmission and is highly sought after. I wanted to keep the six-speed, but we couldn't find an economical option (rebuilt transmissions can start at $1,800). And this is when we discovered - and ultimately went with - option three: find a five-speed transmission and take the portion with the engine mount and put it on the six-speed.
We headed off to the junkyard and - miraculously - found a wrecked car with an undamaged five-speed manual transmission still in the engine compartment. Jackpot.
Two days later, I was the proud owner of a junkyard transmission and a broken six speed. It was time to hybridize parts yet again.
As complex as these machines look, they're still simple enough to repair.
Problem three: get into the transmission. These are complicated machines that work so well, their overall design hasn't really changed since cars were invented. A series of levers slide collars over gears which send power to the wheels. The power of the Internet confirmed that we were on the right track and we even found a mechanic with a GoPro who showed exactly how to take the transmission apart. So, we set to work.
A couple hours and a broken tool later, we gave up for the night. I went home, questioning every decision I've made to this point. I woke up after a fitful night of sleep and decided it was time to just take the things somewhere. I called nearly every transmission shop and mechanic in the region, but no one wanted to take on such a daring project. Most transmission shops don't even touch manual shift vehicles anymore, which is a bummer. They're repairable! I'll save those comments on American replacement-ism for another day.
Late that morning, I caved and called the dealer service department. Their transmission engineer was willing to give it a shot. With a burst of hope, I loaded everything into the van and drove down to drop things off.
The next day, the shop called and the transmission tech decided it wasn't something he wanted to mess with, either. I asked that he simply remove those top gears so I could dive into the belly myself, which he agreed to. Back to square whatever-we-were-on-two-days-ago.
At this point, I had resolved myself to buckling down and doing the work. Several late evenings and a full Saturday with my brothers-in-law working with me, we had the transmission repaired and re-assembled. The most difficult part, frankly, is getting the thing (it weighs ~90 pounds [41kg] assembled, so it isn't small) back into the tight engine compartment. But we managed it and I could see the light at the end of the tunnel.
Another late night, alone in the garage, and the car is nearly done. After I hook up the battery, I decided to start the engine before I put the wheels back on. All had gone well and I was looking forward to being home before 11PM.
But.
The car wouldn't start.
The good news is that a non-starting car is not usually do to the transmission. So, something was wrong, but it probably wasn't the big something that we just fixed. I started poking and prodding with a multimeter to find the culprit.
The battery was good. The starter was good. I had ground between the battery and the body of the car. The dashboard would light up and I could even get the radio going. So, there was a short somewhere, but I couldn't find it on my own. Generally, you need to be checking power while someone tries to start the car.
I got one of the brothers-in-law back over to help out and we found one ground wire that had a slight loose connecting, but it was slight enough that the starter couldn't pull enough power from the battery. Those connections matter a lot, especially in that high-current surge to turn the engine over cold.
At 10PM on Monday night, the car started for the first time in over a week. The clutch is smooth and the gear shifting feels like butter. It's driving well and I feel like we can easily get another 100K out of this little sprite.
I could write a trite thing about time and patience, both of which were stretched in this little party, but I won't. This was just one of those life things that will help me remember that big projects are doable when you break them down, rely on the expertise and wisdom of others, and get your hands dirty to solve a problem when one comes up.
The great Twitter Migration is causing all sorts of hype around Mastodon, but, in my opinion, for the wrong reasons.
People disillusioned with Twitter since Musk took over are flocking to Mastodon to the tune of hundreds of thousands of registrations per day. That is astronomical growth for what has been, for the last several years, niche communities of people around shared interests.
If you've never used it, the look and feel is very close to that of Twitter. Your timeline takes up the majority of the interface, you use "@" usernames to mention people, and you can follow topics using hashtags. There are some nuances in the differences between a singly-owned space like Twitter and the interconnectedness of individual Mastodon services (instances), but for the most part, the look and feel is similar.
I'm definitely not the first to say Mastodon is more comparable to email than it is to Twitter in terms of system structure. With email, you pick a home - @yahoo.com, @gmail.com, etc. Mastodon is similar - your username is linked to your home. For me, I'm brianb@fosstodon.org.
Looks are deceiving
With federated spaces, your home is part of your identifier. Instances look the same, but the community guidelines, norms, and expectations can vary widely. To really understand the value of Mastodon, it lies in the expectations of people within the community. This is where the email analogy breaks down and where most articles about Mastodon fall short.
Email is federated - different services talk to one another using a shared set of rules for communicating. But I don't see what other people on gmail.com are saying (nor do I want to). Mastodon provides this structure but in a social media context.
Mastodon is federated for a specific reason - a single entity setting the rules for everyone is usually not the best way to go. Each instance is able to set their own expectations and the runners are provided tools to moderate the space. When you're joining an instance, it isn't just a place to post. It's a community you are joining intentionally.
Community and trust building
Joanna Stern has a simple overview of Mastodon on the Wall Street Journal and she touches on the difference of trust as capital in a new social media paradigm:
We’re in a big trust exercise,” said Jennifer Grygiel, a communications professor at Syracuse University. “Is the server in some rando’s closet maybe better right now than Elon Musk’s Twitter?” Prof. Grygiel suggested looking for different trust signals on Mastodon, including servers with larger populations and those pitching more supportive communities.</p>
There's trust in the people who are running the instances. Sometimes, it's single administrators running a public instance while others are teams of people. Either way, you're shifting your trust from a corporation to not be bad to an individual or small team of people - all of whom have names and faces within your community - to act in everyone's best interests. In return, as a member of the community, we act in accordance with the community norms.
Many instances have had some growing pains this week as new registrations flooded in. Some technical pains, but many more cases of culture clash. Hugh Rundle makes a good point in his post:
It's not entirely the Twitter people's fault. They've been taught to behave in certain ways. To chase likes and retweets/boosts. To promote themselves. To perform. All of that sort of thing is anathema to most of the people who were on Mastodon a week ago.
When you join a community, take time to make a good introduction and then spend some time looking at your local timeline. See who pops out and follow to begin curating your own Home feed. Once you feel comfortable, start searching with hashtags for your other interests to gather people from outside your home instance.
Most importantly, take time to listen and get the vibe. The time it takes to de-Twitter extends well past when you shut your account down. Resist the habits of interaction developed on Twitter because they don't fit well with the structure of your Mastodon instance.
“This is a little bit more complicated. But in the long run, for people who are interested in a more community-oriented space, I think it is very much worth it.”
Slow down and really take some time to rethink how - and why - we spend time in these spaces in the first place.
Side note, the header image for this post was generated by the Stable Diffusion image-generation AI with the prompt, "a person running away from a giant blue bird in an impressionist style."
I've been longing for an easier way to manage test data in Flask. Specifically, when running automated tests, I wanted an easier way to populate a database with some known values which would then be used in the tests themselves. This turned out to be tricker than I thought, but I learned a bunch along the way and I'll share that process in detail here.
Why I needed test data
I tend to focus on integration tests - I'm interested in how the application takes in requests and returns a response. Having test data in my database allows me to define test results easily. I know what types of responses I should be getting from each route and dynamically loaded data from a JSON file allows me to quickly define those results over and over.
Up until this point, I would create database objects like normal, using a model constructor:
importunittestfrommyapp.modelsimportEvent,UserclassMyTestClass(unittest.TestCase):defsetUp(self):user=User(name="My name",email="myname@example.com")user2=User(name="Another name",email="another@example.com")event=Event(title="Some event")db.session.add_all([user,user2,event])db.session.commit()# the rest of the testsclassAnotherTestClass(unittest.TestCase):defsetUp(self):# do the same thing...
The problem with this is that it is extremely repetitive. Each test (or each TestCase instance) has its own database declarations which have to be loaded when the test is run. That means I'm either typing each record for each test or I'm copy/pasting items in between tests. If my routes ever change I have to change each instance of the test as a result, which is no fun.
Using libraries
I came across two libraries, but neither really solved my problem but for different reasons.
Flask Fixtures is a library which allows you to run unit tests based on JSON representations of your data. It takes in a list of JSON files and then populates an in-memory sqlite database. I tried this method, but the library hasn't been updated in several years and didn't play well with Flask's application factory pattern.
I had Factory Boy recommended, and while tempting, I needed to have consistent data in memory to run tests against. That said, I'll probably come back to Factory Boy for generating large data sets where I have more freedom in how I test.
I like the pattern of using JSON to populate a test database on the fly. I ended up writing my own, much simplified, version of Flask Fixtures.
JSON structure
I followed the pattern in Flask Fixtures because it provides a clear, extensible way of loading data into the application.
Each file can be expanded as necessary, adding new items or new files to expand the test database scope on the fly. These files live inside /test/fixtures in my project tree.
Dynamically loading test data
Instead of defining database records at the start of each test, I now define records in JSON files which can be loaded on demand within a test or set of tests. The biggest change in my app structure was to handle application context appropriately.
A new Loader module is created with the current application instance, database, and a list of fixtures to load into sqlite. The module only runs within the current context, so I can control when loading happens within the individual tests, even loading data after the setUp function has run.
importjsonimportosimportunittestfromsqlalchemyimportTablefromapp.extensionsimportdbclassLoader(object):"""
Reusable class for loading fixture data into test databases.
Initialize with an in-context application and database engine.
"""def__init__(self,app,db,fixtures):self.app=appself.connection=db.engine.connect()self.fixtures=fixturesself.metadata=db.metadatadefload(self):forfilenameinself.fixtures:filepath=os.path.join(self.app.config["FIXTURES_DIR"],filename)withopen(filepath)asfile_in:self.data=json.load(file_in)self.load_from_file()defload_from_file(self):table=Table(self.data[0]["table"],self.metadata)self.connection.execute(table.insert(),self.data[0]["records"])returnclassMyTest(unittest.TestCase):defcreate(self):self.app=create_app(TestConfig)# Build the database structure in the application contextwithself.app.app_context():db.init_app(self.app)db.create_all()returnself.appdefsetUp(self):self.app=self.create()# Set up the application context manually to build the database# and test client for requests.ctx=self.app.app_context()ctx.push()self.client=self.app.test_client()# Include any data to be loaded into the databasefixtures=["events.json","users.json",]# Now that we're in context, we can load the database.loader=Loader(self.app,db,fixtures)loader.load()deftearDown(self):db.session.remove()db.drop_all()
Main takeaways
My biggest frustration was figuring out application context. This update to my test runner included moving to an application factory pattern, so I had to rethink how everything ran from the ground up. In the main application, context is handled by the create_app function and I didn't have to think about what context was active. In the tests, that has to be done manually with each instance. Moving the app context into startUp ensured only one context was used at a given time.
Being self taught, I do my best to apply best practice principles like "don't repeat yourself" (DRY). This was especially noticeable as the number of tests increased and I'm happy with this solution. There's still some boilerplate for each test case and one of my goals is to wrap that up in a unittest.TestCase subclass so I can simply inherit the boilerplate rather than type it out. I'm still working on the best way to do that for my use case.
This is probably one of the more complex problems I've had to solve on my own. The application itself is just a layer to interact with database records, so the logic itself isn't too complex. Writing my own module to handle the automated work was new and I'm happy with the result. I'm hoping to be able to expand on it and eventually (maybe?) package it up into something I can import and use in some other projects. But that's another task for another day.
In September, it was my family's turn to battle COVID-19. We're not sure who brought it home first, but it hit me first. Hard.
Not as hard as a lot of other people, but I was flat for a couple days battling high fevers and severe muscle and joint aches. Luckily, I didn't have any of the breathing issues that have hurt so many people. Following me, my wife and kids all came down with positive tests, so we settled in for - what we hoped - would be a relatively short infection period.
Unfortunately, our tests lingered positive. We stayed away from family and friends. We weighed how to safely get groceries (we're pretty rural, so delivery isn't really viable), and how to pass the time. The hardest part was when we were all feeling better, but still testing positive.
We ended up finding ways to be outside together away from people. We took trips to local creeks and parks. We spent time working in the garden on the farm, preparing for winter. One of the best trips was to Warren Dunes State Park about 30 minutes north of here.
The sand stretches in every direction.
The kids hadn't ever been to the dunes, so this was a treat for us. In the parking area, there is a monster dune immediately across the road and they started running to the top. By the end, they looked like Everest hikers, stopping every couple of steps to catch their breath due to the actual height and an incredibly steep grade.
Warren Dunes is nearly 2,000 acres and has public camping access, so there are trails all over the dunes to different campsites. They weave down, in, and around natural trails through the scrubby dune grass so you move from full sun to shady and change elevation quickly (if you want to). There are also several stretches that cross the ridges of adjoining dunes, so you can move across the area with amazing views out across the lake.
We chose to stay on top instead of going down and then back up.
We've lived in small-child land for a very long time. This was the first time our three year old was almost as independent as his older sisters. He wanted to walk, slide down hills, and climb with the older kids. My wife and I were actually able to walk and talk together while the others explored.
I think this is the start of the next phase of family life - one where we can begin to set and break boundaries at the same time. It also makes me realize how many of the childhood memories I have were created by my parents - and we need to do the same. We're looking forward to protecting our family time so we can get out and explore more frequently.
This is a great look at how our practice of teaching needs to change if we want students to think differently about school. The author writes from the perspective of doing this as a result of going gradeless, but the same habits of instruction can be used to make the same shift if gradeless isn't an option.
...I find that students approach me with a different question; “Can you show me how to do this?” Since my students are self-assessing their work regularly throughout the term, they always have a strong grasp of where they have shown understanding and where they are developing their understanding.
The same thing often happens in standards-based approaches to grading or even just focusing on feedback to drive your interaction with students. The critical component is to hone your own responses to questions to point students back to the main goal: learning.
The end of summer break is always a little weird. I have a shorter vacation than normal because of the nature of my job, but going back to work at the end of July still feels...too soon.
I'm thankful for my breaks. It seems strange in the US to get such a large block of time away from work and I'm getting better at actually taking a break.
I originally titled this "Summer's End," but I'm reminding myself, like.i reminded my kids last night, that going back to work doesn't mean summer is over. It just means our schedule changes a little bit.
This week, my wife pointed something out to me: our entire dinner was either something we grew or something we helped raise. Vegetables from our garden. Pork from working with my brother in law and his animals.
Time spent in the ground and with the ground is never wasted.
I was watching a farmer process chickens when learning how to do our own and he said something that has stuck with me.
Something had to die for you to live today.
He meant animals, but the same is true for our vegetables. We work hard to make sure we grow and raise food well so that we can appreciate the value it brings to us when it comes time to harvest. We're starting to understand that more. My kids might understand it better than I do.
We're early in our work to establish a sustainable space and I'm looking forward to when more dinners we're raised here, at home.
Summer brings some pop up storms at the end of the day when the humid air starts to cool. They often form over Lake Michigan to the west and slowly move west, reaching up until they flatten.
Looking west from the house, we get to watch these spectacular white towers slide across the landscape. Oftentimes, we hear the rain before we feel it.
Clouds tower in the west.
The late day storms are my favorite because the setting sun is still able to backlight the delicate edge of the cloud, reminding me that storms come and go.
We're in the throes of summer and there have been a number of events, ranging from new construction (because there is never enough stuff to build), beekeeping, and birthdays. Here are a few highlights.
This guy turned three.
The honeybees are going gangbuster.
Chores with the animals usually include a pit stop at the swing set to get some wiggles out.
We're building a barn.
I'm not posting to social media much. I post some to Pixelfed and (even less frequently), Instagram.
Now that I've finished a rewrite of an application in HTMX, I wanted to see if HTMX could be used to enhance the use of Google Apps Script sidebar interfaces. I build these from time to time at work to help with spreadsheet interaction that goes beyond simple formulas. The idea is to allow for more dynamic interactions in the (very limited) sidebar available through Google Apps Script.
HTMX: This Won't Work
I started with adding HTMX directly and had no luck. The main issue is that HTMX uses ``XMLHttpRequest` to fetch data <https://developer.mozilla.org/en-US/docs/Web/API/XMLHttpRequest>`__, and that leads to CORS issues. When HTMX starts a request, a preflight check is made because it includes the upload parameter, which is considered "not simple" by the browser. This preflight check has to pass for the request to proceed.
The preflight fails because of the redirect between the published Apps Script /exec endpoint and the googleusercontent URL with the actual code. HTMX also adds headers to the request, which also makes the request unsafe and the preflight check fails with a CORS error.
So, I tried getting around the CORS issue by issuing async fetch calls, but that just adds a layer of complexity rather than solving a problem. It also confirms the fact that browser engineers are much smarter than me because it still didn't work.
All that said, fetching content directly from a sidebar won't work, let alone posting data to the backend.
Hyperscript to the Rescue
Hyperscript is a companion to HTMX which offers similar functionality, just in a different context. It's a lightweight scripting language with Python-ish syntax that you can include as a "_=*" attribute on HTML elements. You can add different handlers and listen for events just like with HTMX, so clean interactions are still possible.
Using Hyperscript, you can take advantage of the google.script.run() API to interact with your Apps Script code. This allows you to do some simple dynamic content replacement all the way up to accepting input from a user to query or update data in the sheet through the sidebar.
There are some utility functions we need to get the project started. I'm greatly indebted to Bruce McPherson and his extensive writing on Apps Script project structure. In your Code.gs file, we'll create some global functions to allow us to work more effectively between the Apps Script code and the client.
// Code.gs// Allow the client to access your Apps Script functions dynamically.functionexposeRun(namespace,method,argArray){varfunc=(namespace?this[namespace][method]:this[method]);if(argArray&&argArray.length){returnfunc.apply(this,argArray)}else{returnfunc();}}// Utility function to include other files in HTML templatesfunctioninclude(filename){returnHtmlService.createHtmlOutputFromFile(filename).getContent();}// Trigger the menu to open the sidebarfunctiononOpen(){constui=SpreadsheetApp.getUi()ui.createMenu('Menu').addItem('Run','showSidebar').addToUi()}// Display the sidebarfunctionshowSidebar(){consthtml=HtmlService.createTemplateFromFile('template/_base.html').evaluate().setTitle('The sidebar');SpreadsheetApp.getUi()// Or DocumentApp or SlidesApp or FormApp..showSidebar(html);}
I'll also use Bruce McPherson's Promise-based wrapper for working with Apps Script as a starting point. All of our requests will go through this method:
// static/main.js.html<script>varRunner=(function(ns){ns.run=function(namespace,method){letrunArgs=Array.prototype.slice.call(arguments).slice(2);if(arguments.length<2){thrownewError('Need at least a namespace and method.')}returnnewPromise(function(resolve,reject){google.script.run.withFailureHandler(function(err){reject(err)}).withSuccessHandler(function(result){resolve(result)}).exposeRun(namespace,method,runArgs)})}returnns;})(Runner||{})</script>
Templates
Now that the boilerplate is done, we need to start defining some worker classes and templates.
To keep things clean, I wrap each of my operations in an IIFE object which defines methods and the templates to return with each completion. This means there are more files to manage in the code editor, but each one encapsulates function cleanly and it's easier to maintain.
Make the Apps Script handler:
// SimpleSwap.gsvarSimpleSwap=(()=>{consthtmlTemplate=()=>{lethtml=`
<p
class="active"
_="on click set my innerHTML to 'Clicked!'"
>Click me!</p>`;returnhtml;}return{htmlTemplate};})();
And finally our base HTML template for the sidebar:
// static/_base.html// This is the sidebar wrapper. Content will be inserted dynamically.<!DOCTYPEhtml><html><head><basetarget="_top"><scriptsrc="https://unpkg.com/hyperscript.org@0.9.5"></script><!--Ourpromise-basedrunnergoogle.script.run()requests--><?!=include('static/Runner.js');?></head><body><main><divclass="main-container"><divclass="sample"><b>Dynamicinsertionandinteraction</b><!--HyperscripttointeractwiththeAppsScriptcode--><button_="
on click
call Runner.run('SimpleSwap', 'htmlTemplate')
then put the result into #target
then call _hyperscript.processNode(#target)
">trigger</button><!--Thisreceivestheresultoftherequest--><divid="target"></div></div><!--otherdivs...--></div></main></body></html>
This template will:
Allow us to access the Runner middleware to marshal API calls.
Click a button to run a bit of code.
Put the result of the Apps Script code into the #target div.
Initialize any Hyperscript included in the template to allow for interactivity following the swap.
The key in this method is to think through what interaction you want your template to have and to include that in the hyperscript attribute.
A More Complex Example
Let's say you want to make an Apps Script Extension (formerly "Add-on") or container bound script which allows you to fetch data from an API and then selectively insert results into your sheet. You can do that with Hyperscript inside the Apps Script sidebar quite cleanly. We'll keep the same boilerplate code but define a couple of functions to build a quick sample. I'm going to use the handy Star Wars API as the data source.
// SWAPI.gsvarSWAPI=(()=>{// We'll use these sheet params to interact with the spreadsheet.constss=SpreadsheetApp.getActiveSpreadsheet();constsheet=ss.getSheetByName('Sheet1');constgetPeople=()=>{letrequest=UrlFetchApp.fetch('https://swapi.dev/api/people').getContentText();letjson=JSON.parse(request);// Apps Script templates can evaluate data dynamically. Call the// template fragment and then define a parameter on the object you// want to access.// https://developers.google.com/apps-script/guides/html/templates#pushing_variables_to_templateslettemplate=HtmlService.createTemplateFromFile('template/swapi-list')template.people=json.results;// Evaluate the template and then get the resulting HTML to return.lethtml=template.evaluate().getContent()returnhtml}constsaveName=(name)=>{sheet.getRange(sheet.getLastRow()+1,1).setValue(name);}return{getPeople,saveName}})();
And lastly, our new template fragment which handles looping over the results as part of the evaluation step.
<!-- templates/swapi-list.html --><!-- Read the docs on Apps Script template evaluation if you
haven't looked them over before. They can be quite helpful
https://developers.google.com/apps-script/guides/html/templates
--><? for (var i=0; i<people.length; i++) { ?><spanclass="active"_='
on click call Runner.run("SWAPI", "saveName", "<?= people[i].name ?>")
then remove me
'><?= people[i].name ?></span><? } ?>
To help understand what's happening, we are:
Rendering a sidebar with a button to fetch results from a third party using URLFetchApp.
Allowing the Apps Script templating engine to handle rendering results.
Collecting the resulting HTML string and sending it back to the client.
Hyperscript swaps the HTML result into the DOM and then re-initializes on the new elements.
Clicking on a name adds it to the spreadsheet and then removes the option from the page.
Here's the result:
In the template, we define Hyperscript actions on each element so they also become interactive in the sidebar. Clicking on a name calls the saveName function and adds the value to the next available row in the sheet before removing itself from the sidebar.
Is it worth it?
This seems like a ton of work that could be achieved with out-of-the-box Javascript. So, is it all worth it?
It depends.
If you have minor interactions here and there, it might not be worth adding the extra attributes or taking time to create template fragments. DOM interactions can be pretty simple if you're just fetching and displaying data.
The real power of Hyperscript comes in locality of behavior and in making interaction plain in the HTML and not burying those actions in script files and event listeners. In the advanced example, I think Hyperscript is worth the effort because it is easy to see exactly what interactions exist on which elements.
Apps Script is notorious for weird behavior just because of the platform. Adding Hyperscript as a tool to manage interaction and behaviors can help identify bugs sooner because you - the developer - have a better idea of which interaction causes which behavior in the application.
If you're on the fence, take some time just to play around with simple swaps like I showed in the first example. Once you have the hang of writing behaviors on elements rather than in event handlers, some of the benefits will start to emerge.
Last year, I built an event registration tool for our district, mainly to keep track of what professional development we were doing and try to get paper out of the workflow. I chose to use Flask and Svelte for this project and this year, I decided to move away from Svelte and rebuild the application using HTMX. In this post, I'll explain why I decided to make the change and highlight some situations where HTMX just makes more sense for a large app managed by a single person.
Making a Switch
I'm self taught. I started playing with Internety things in the late 00's, starting with WordPress and straight HTML/CSS. I added Javascript slowly and since then, have managed to cobble together some kind of useful tools. Mostly for myself, but some to benefit others.
I had tried taking a dive into React, Meteor, and Vue, all with little or no success. The complexity of the frameworks and the abstraction needed to get stuff to show up on the page went way over my head, especially as a hobbyist. Adding complexity was the requirement to use build systems (I know Vue can be added directly with script tags, but that's not where I was introduced to it) and those felt untouchable.
Over the 2019-2020 school year, I got what I'll call a "working prototype" of an events registration system published using Firebase, some HTML, and a lot of vanilla Javascript. That pushed me closer to understanding build systems and when Svelte came along, its syntax finally felt familiar - just some template tags with scoped Javascript and CSS. Not too hard to handle.
I had a published version of the registration site by fall 2021 and it worked well for a first "real" project. Python did the heavy lifting in the background and I was able to have a nice interaction on the front with Svelte. So, why the move?
There are two main reasons:
It's essentially an application to create and maintain records. I don't need elements to be running continuously (ie, a video player) while the user does things. Having a Javascript-built application was overkill for the purpose of the site. Rich Harris (creator of Svelte) elaborates on this in a podcast on when to use single-page applications over multiple-page structures.
Maintainability of large Javascript-based systems is very difficult. Granted, I'm an amateur and this was my first project, so there are things I can certainly do better to take advantage of the systems, but I found myself reluctant to touch the app for updates because it would take me so long to untangle how everything worked together.
With those issues in mind, that's why I decided to move to HTMX.
How is HTMX Different?
I started following Carson Gross, the author of HTMX (formerly IntercoolerJS) and reading some of his essays, arguing for a return to hypermedia as the main driver of the web rather than Javascript. For my background, this made a lot of sense. Servers exist to serve content. The modern Javascript frameworks were created to allow for non-full page refreshes of content. HTMX blends those two goals, allowing the server to send content to the client and allowing for dynamic and strategic (even surgical) updates to the page the user is on.
This provides instant benefit in several ways:
The client no longer has to manage state. The server already knows the application state, so why not just send content that is stateful based on the user session (ie, logged in vs not logged in)? Using Flask sessions makes this very simple.
Templating engines can still be used for dynamic content creation. Each template contains the content it needs and doesn't have to re-wire itself with the other items on the page once it loads.
Specific elements can be updated as a result of a user action. The user interaction is clean and does not require any full-page refreshes, but without any of the messy Javascript workarounds to make that kind of interaction possible (looking at you, shadow DOM [whatever that means]).
Each request returns everything the user needs. You're not required to make more network calls to get the data necessary for the view or template (I think that's what "hydration" is).
With any Create/Read/Update/Delete (CRUD) tool, form rendering is a common task. I want to dive into the difference between doing this in Svelte and HTMX as an example of why I decided to make the move.
Form Rendering
In Svelte, I created a FormWrapper component which would dynamically handle input element rendering and form submission. This pattern was extremely helpful and I actually took some of the principles I learned and applied them to HTMX. The snarls came in determining what actually needed to be rendered.
A simple example is this view: when the user clicks on one of the action buttons, a form is rendered. Depending on the action, the form is different. In Svelte, you need to first render the form and then fetch the fields - two network calls to render. It works this way because Flask is serving JSON - agnostic structured data rather than data which carries all the information it needs in order to render.
Svelte form wrapper
So, a couple hundred lines of code to render a form. Reusability is good, but when it came to editing a form, it got gnarly really quickly. The main drawback was that for the form to even render, it required several more requests to the backend to get the fields necessary. Because the backend was just a JSON cannon, even the data it returned needed to be mapped and filtered into a usable state.
HTMX form rendering
With HTMX, that form is pre-templated and then sent from the server. Instead of a single endpoint to return all the form data, individual endpoints can be used to send back whatever form is necessary in HTML. There is no needed to request more information or process the data in the client to make it usable.
Because of Flask's templating engine and thanks to the extremely helpful Jinja partials extension from Michael Kennedy, I was able to mimic the dynamic action where a temporary sidebar is used to load and display the form.
The obvious tradeoff is that there are more files to maintain. But because each file is single-purpose, they're smaller and more focused, which means maintaining is much easier. It's also much more clear what is being returned by each operation rather than firing the JSON cannon and then untangling everything on the client.
The Takeaway
I'm very happy with the decision to make a switch. In the cutover, I've made some incremental improvements that were on the list of "someday" changes, but had felt overwhelming to try and attempt because of all the side effect potential. I'm also not saying that Javascript frameworks like Svelte are a terrible idea - writing this app in Svelte to start helped me learn how to build resilient and flexible backends.
For me, the value in HTMX comes back to maintainability and developer experience. The language of the web is HTML. Svelte was a good entry point for the initial build because its syntax was very close to plain HTML. But in the end, it still relied on Javascript to work and instead of feeling flexible, it felt brittle.
HTMX's approach to adding functionality via HTML attributes is much closer to the surface of normal web structure and gives just as much flexibility for 99% of what I need to do at a much lower complexity. I just enjoy working with HTMX because I can spend less time trying to figure out where an emitted event goes to make an update and more time making the tool more useful for my colleagues. That's a win every time.
Thanks for blogging this Brian although my understanding level is hovering at 16% 😉 But something I did pick up on is what I want to be implementing more on some work projects, being able to create filterable tables of data, where you can provide a place to dynamically pare down tables of stuff to ones of interest.
I like AwesomeTables but you have to pay per app. And I tried the Google Dynamic Tables thing but it looked like it was built for something else- I get a sense HTMX might be a way. And like you, I prefer this HTML oriented approach.
Oh boy, you’re in for a treat. HTMX has a partner tool called hyperscript which allows for some lite client scripting. It’s made by the same author and it’s pretty much plug and play with HTMX. I’ve got it filtering tables (alphabetical clicking on table headers) as well as an active search on rows in large tables, all right there in the HTML. I’d be happy to send a demo if you think it’d be helpful.
This is a quick tip, but if you've ever tried to sort a sheet with vertically-merged rows, you've probably been disappointed. Here's an example:
If you wanted to sort your sheet by Column A, you're out of luck. You can't do that automatically because Sheets doesn't know how to move blocks of unmerged cells even though they're right next to the merged range. Your best bet in that case is to highlight all of the rows in the merged range and drag & drop in the correct order.
Even though the gray line while you're dragging makes you think you can drop a merged range into another, you'll get an error if you actually try to do that.
This won't work for super-large data sets, so try to alphabetize as you go.
You can, however, sort ranges within selections, not just the entire sheet. So I can sort the names within each team to make life easier.
Highlight your range and right click to bring up the menu. At the bottom, hover over "View more cell actions" and then select Sort Range.
You can sort this selection how you'd like to at least have your subset data in the right order.
This is why I typically don't use merged cells when creating large spreadsheets. It makes it harder to move data around the way I'd like to.
I've been hobby programming for several years that has spilled over into making applications for staff at school. One of those tools is a website to manage PD events, signups, and documentation. This week, I accidentally deleted that database.
I don't want to downplay how bad this was, but it also isn't on the scale of losing student or financial data. But, it was roughly eight months of events, signups, and more importantly, participation records. Several things went wrong, all of which I should have caught at some point:
My database migrations (history of changes to structure) didn't match between my computer and the server.
I didn't double check the data in the database dump I had made before re-importing it.
I had an artificial deadline in my head and I didn't slow down in the process of the changes.
We're constantly trying to follow best practices when it comes to accessibility. The change I was introducing allows staff to request accommodations on their registration so the presenter knows to do one thing or another. In addition to our general presenter guidelines, this helps make sure everyone's needs are met in a non-obstructive way.
I learned some things...
First, instead of trying to force the migration history to reconcile, I should have slowed down and fixed the root issue. Those migrations files are critical to making sure everything moves around in a way that can be reversed and repaired. Instead of reconciling the differences, I made some quick changes to which steps were related to one another and that contributed to the problem in the first place.
Second, I assumed the database dump from last night was good enough. I didn't check to see that it actually had good data in it. As it turns out, the dump was blank - and that means that when I reloaded it back into the database, I effectively erased everything. Since that was my only backup, there was no chance to roll it back to a previous state. So, now we'll be doing nightly backups as well as dumps right before migrations to make sure we have at least one good copy. I'll also be checking the file directly to make sure it holds information, period.
Third, I wanted to get the update in place. It didn't take too long to make and the code itself wasn't too complex. I wanted to say it was done and be able to move on. Instead, I ended up giving myself about 10 more hours of work to piece information back together and then work out ways to safely integrate everything back together. Deadlines are always flexible, especially when you're setting them yourself.
I did have one stroke of luck in this whole ordeal: when a session is created, a Google calendar event is automatically created. When someone registers for that event, they are also automatically added to that event as a guest. Since this only affected the site database and not the Google Calendar events, I was able to use some quick-and-dirty Google Apps scripts to restore users, events, and their registrations. The only thing I couldn't restore was attendance data.
Scripts
The first task was to get all the events on the calendar within a date range. I like using the Calendar v3 API because it gives me access to more properties on each Event that we can throw into a spreadsheet.
Once I had this sheet, I was able to do things like repopulate all users, extracting their data from the attendees string and using the Admin SDK to look up their name and location:
In this case, I got lucky that most of what I needed was available in the Calendar. Knowing what's available in Apps Script made this a partial loss rather than a total loss.
This post has been percolating in my mind for several months. It started as an opus that sat stale in my drafts because I didn't want to wrestle the mess it was into something readable. Then I pretty much forgot about it because, in the end, .
In that time between writing a fiery essay and not really caring to write at all, I finally settled on why web3 doesn't sit well with me. And it comes down to systems of trust.
Set the stage
For the sake of clarity, let's get on the same page. web3 is a buzzword right now which posits that the "next" version of the Internet will run on the blockchain. This is manifested from the rise in popularity of Bitcoin and other cryptocurrencies, the NFT weirdness happening, and techno-futurists hedging on being a part of the "next big thing."
The platform dictates the conversation, and since education and technology are intimately woven together (for better or worse), there are articles and accounts popping up, prompting teachers to start thinking about how to make sure they're ready for the blockchain.
How did we get here?
Understanding how this all works is important to forming an informed opinion. Again, this is a very brief description, but here's a rundown of some of the history.
"Blockchain" is a technology which is essentially a history of something done that cannot be changed. Once something is on the blockchain, it's there forever. The history is public and everyone contributing to that chain can verify the record. The idea was developed in the late 1980's and early 1990's, but didn't really come into play until the release of Bitcoin in 2008. Since then, blockchain technology has been seen as the next big thing in everything from currency to supply chain routing to vegetable freshness. If you're interested in a technical rundown of blockchain, this article was immensely helpful to me.
Bitcoin's big selling point is that you can have secure financial transactions if everyone can see the entire record. In simple terms, a blockchain is a database that you can only add records and only if everyone else watching the chain agrees. Instead of relying on a bank to tell you who paid what to whom, a network of computers manage the consensus model for any update made.
Imagine you're at a soccer game. Instead of there being one scoreboard which displays the current state of the game, every person in the stadium has a scorecard where they keep the game score. Normally, when a goal is scored, the authority (referees) update the scoreboard and the game continues. In our imaginary blockchain soccer game, any time there was a goal, every person in the stadium would have to agree on the new score based on that goal.
The idea is the same in the digital space. When a change is made to the blockchain, every computer involved in that network adds to the consensus of that change.
Systems of trust
Every structure in society is based on trust. I trust my employer will give me a check every two weeks. I trust other drivers on the road will stay on their side of the road. Blockchain technology moves trust away from people and into technology. There are certain benefits to trusting in systems (traffic lights being consistent, for example), but there are also drawbacks, especially when it comes to web3 and education.
At its core, our time with students is based on trust. Parents trust us to make wise decisions for their children. School systems trust teachers to implement the curriculum with depth and rigor. Students trust us to watch out for their best interests. Trust is built into every interaction in the school day and relationships are the backbone for why most of us are teachers.
web3, on the other hand, asks us to trust in the distributed blockchain network. Trust is in the system rather than the person. For a blockchain to work, you need a lot of people (computers, really) to trust one another. In simple examples, it sounds like a great idea. That student actually turned in that assignment.
But when we get into the nuance of some of the proposed benefits of web3, you lose the relationship aspect of teaching and learning completely. Is this their best work? Is this actually their work? We see this already with surveillance tech making it's way into classrooms across the country - systems which assume the student is an adversary before the first day of class.
With relational trust systems, there are avenues for disagreement. Dialogue and relational history come into play when we're judging student work. With web3, we're relying on a distributed network of computers to make a judgement call. If that is the wrong judgement (or a false judgement - theft and fraud still happen with Bitcoin), there is no avenue for recourse.
Permanent scars
Trusting in a system which cannot be revised may have some fringe benefits, but at the end of the day, we want our students to grow. We want students to be better citizens today than they were yesterday. With an educational web3/blockchain, any past mistakes are there forever as signposts of bad judgement. Rather than giving students an opportunity to describe lessons and what came of those situations, they're now an open record for anyone to interpret however they want. Systems of trust are better when people are involved, not when they're distributed.
Technology trends sweep through education just like they do through hedge fund and venture capital circles, albeit somewhat slower. This is an important enough topic to read and think through what implications could come as a result of being a part of the "next big thing." Because if we get this wrong, it's going to be pretty hard to go back.
Other reading
I spent a lot of time reading and chewing through resources to learn more about the underlying technology and some of the other problems that make blockchain a questionable solution to many of the problems it claims to solve. Here is a selection you may find helpful.
Blockchains neither perform nor scale. If you didn't read the technical article I linked in the post, this excerpt explains the purely nightmare that comes from relying on blockchain to store data.
If you want a quick way to check if images on a webpage contain alt text (for screen readers), I made a bookmarklet that will blur images without that text.
Click and drag this guy up to your bookmarks bar. Click it on any website to blurify images that are inaccessible.
Mike Nikels tweeted this last month and it's stuck in the back of my mind:
Still my favourite CSS trick in years. Thank you @estellevw!
I've been trying to be much better about including alt text in everything (thanks to Alan Levine barking about it all the time, too). I wrote a little script that runs in Tampermonkey, but that's a high barrier for entry. So is a Chrome extension.
So now it's a bookmarklet.
You can drag the mark up above into your bookmarks bar. Click it on any webpage to have any image without alt text blurred.
Here are some sites to try:
This blog. The first image below has alt text, the second one doesn't (just to prove it works).
YouTube.
Any news website.
Your favorite cooking blog.
Alt text is how images are described for people who have vision impairments. By not providing the text, they immediately lose out on whatever you're trying to say.
It's also important to remember that alt text is different that the little hover text you see when you hover an image. That's the title tag and displays. Often, the text is the same. But sites which show a title don't always include alt text as well. YouTube in particular becomes a very different experience.
Anyways, more of a little helper to keep myself from slipping. Try it out. The source is here if you want to take a look or improve.
My job for the last six years years has been to identify and provide professional development for staff. We set goals, looked at upcoming challenges, and worked toward meeting the needs on the horizon. In that, the team I was on worked hard to infuse practice into the skills we were teaching. It was a different paradigm and we made some huge progress in a short amount of time.
Then COVID-19 raged across the planet and threw us into a spin. Given all the unknowns, one thing was very clear: we had to train staff and build skill. Fast.
And we did.
Time was given by the district to focus on staff development. They realized that staff would need much more support in the new, online environment. My partner and I worked hours and hours, alongside the teaching staff, to provide helpful materials, workshops, templates, and resources. Teachers had time and space to learn and grow even though things were upside down.
Time and space.
Time and space were given for those shifts to take place. It was a deliberate choice to make room for those things to happen. And because we had time and space, we came out of our 18 months online in much better shape that we would have otherwise.
Now, we're back in school full time.
Coming back to school, we made the deliberate decision to remove that time and space. Our schedule lacks any time for teachers to work together. We have a rigid structure of required work (I don't want to dignify it as "professional development") that amounts to checkboxes on a form. Back to business as usual.
I feel like I've been shifted over into accounting. Time spent doing professional learning is finally paid (thanks ESSER) and instead of setting a high bar and making it relevant, we're reading prompts and watching videos. "Answering" questions and verifying that people have clicked submit. Head knowledge is provided, but there is no expectation or mechanism to work on practice. There is no support or system to make sure what we're taking time to do is being used.
Why?
Because those things don't require time and space.
Not at school, at least.
On the face, our core departments are doing slightly better at communicating, but we have different groups prioritizing different things all in the same timeline. We're lacking cohesive leadership and vision setting. And because everything is a priority, nothing gets our full attention.
Instead of diving in and exploring meaningful, powerful change and merging what we learned while remote with our excitement about actually being with students, we said, "nah."
So, what's there to be done?
On one hand, I can put my head down and do the work given, trusting that people up higher have a better vision for what's needed. I can also listen to the staff I've built relationships with, remembering that the time and space they get is sucked up by other things. Even if we had time and space, then PD probably still wouldn't be at the forefront.
On the other hand, I could do more and think outside the box.
We are still in an emergency, without a doubt. But I'm tired of letting the emergency dictate what we do.
Long-term alignment. Instead of looking at the near term goals, we can reframe any work we do with staff in view of long-term programs. Adopt the same language, make a point of drawing attention to overlap and showing where theory meets implementation.
Immediate payoff. Finding friction points and creating resources that take no effort from staff to use to smooth those out. Things like templates or sample lessons that can be taken off the shelf. Along with those are guides (print and media rich) explaining how we got to that sample, why it matters, and what they can refer to in training for more background.
Instructional leadership at the admin level. I can't get into staff meetings. But I can provide prompts, discussions, and items for principals - arguably the foremost instructional leader in the bulding - to do that for me. Equipping building leadership to carry those supports forward pushes the touchpoints down a level and helps build the building leadership up as a resource.
Clear direction. Even if I'm not setting the long-term agenda, I can provide insight and a commentary on how to reach goals set by the people who do. I'm subordinate to the same system, so insetead of being a policymaker, a policy interpreter and guide is more important.
I still don't know what this looks like day to day, but it's more interesting that what I'm doing day to day now. Even though everything is a priority and we're lacking the traditional time and space, there is room for good work to be done.
Google Apps Script projects can be published as web apps when you’re done with them. This is helpful if you’re building a tool with a simple UI (using HTMLService), but they can also be used as webhooks to do work within a user account.
Google provides the option of service accounts, so why use webhooks?
For my project, it was because I needed to send calendar invites to other people. Service accounts are generally the way to handle those kinds of jobs, but it needed to have full account delegation, which means it can act on behalf of any user in the domain. That wasn't an option in this case, so a webhook became the next best option.
What is a webhook?
In simple terms, it’s an application that can do something when it receives a standard HTTP request. They generally work on a subscription model, where the webhook service listens for an action on a service. It sits in the middle, listening for an HTTP call and then emits another action in response.
For this example, I have our events management app running in Python on a local server. When there’s an action requiring an update to the calendar, it hits the Apps Script webhook and the script does some work before returning a response to the events app.
The Code
In Google Apps Script, doPost and doGet are functions which respond to POST and GET requests respectively. Because I’m calling the script from the server with a payload for the calendar event, I used doPost to listen for events.
The simplest hook you can set up is a function which listens for a POST request from somewhere and returns a response:
When you deploy the script as a web app, make sure it is set to “Anyone” can access but that the script runs as you. And that’s where the magic is.
With a traditional service account, it needs access as another user. There’s no way to limit that permission to a single user from the admin console, which is why I couldn’t take that approach with my project. In this case, the webhook is triggered by a request and then runs as the scoped user.
Using this method, we're able to achieve the same permissions but without giving it access to every other user in the domain.
A Quick Note on Deploying
| Update 11/29/2021
| Many thanks to Joseph for sharing how to update a deployment without generating a new URL. This section of the post remains becuase it is a good example of hownotto manage deployments.
The pain you mention about deployments and having to change the exec URL in the other codebase can, I believe, be removed by the method described in this post. I have used it several times since I discovered it. It's very useful for situations where you've already embedded the exec URL in a Google site or elsewhere.
With the new Apps Script editor, deploys are a pain. You can't use the dev endpoint to test the hook (I don't know why), meaning there's no way to execute the HEAD version of the script in this instance. So, to test your changes, you need to deploy a new version and that gives a new URL for the endpoint. You'll have to update your API request in your other codebase...it's a mess.
If you can swing it, either build in the legeacy editor (still using the V8 runtime) or use clasp to manage your deploys. If I could change one thing about this whole project, this would be it.
Security
Now, how to secure something like this? There’s nothing foolproof, obviously, but there are a few advantages to using Apps Script in this way:
The server handles all communication. I'm not taking direct requests from a frontend client, so there's more control over what is sent.
Google’s deploy URLs are complex, reducing the risk of guessing the direct URL.
Your script can have it’s own validation (ie, an API key) before processing requests.
You can parse incoming requests for specific data structures, throwing errors when the received structure doesn’t match the expected.
you could have a pseudo-CSP implemented by checking request headers for the correct domains and throw errors if they don’t match.
It all depends on how you’re expecting the webhook to be used with that third party.
When a request comes in, it includes an event parameter which holds information for the task. Even though every request is a POST, I listen for different methods in the post body to determine what happens next.
Here’s the same application as above with more detail added:
```javascript
function doPost(e) {
const accessKey = 'someBigLongString';
let result;
let params = JSON.parse(e.postData.contents)
let method = params.method;
let token = params.token;
let userId = params.userId;
// Add whatever other params you want
   if(token === accessKey) {
       switch method {
           case method === 'POST':
               result = {
                   // ...
               }
           case method === 'PUT':
               // etc...
       }
   } else {
       result = {
           'status': 'Forbidden',
           'statusCode': 403,
           'message': 'You do not have access to this resource.'
       }
   }
   return ContentService.createTextOutput(JSON.stringify(result))
}
```
In Practice
The general structure for any web hook is the same:
receive a request
process the method
process the payload
perform some task
return a response
You have the double benefit of hosting the script and user-scoped permissions for individual projects. In the future, it may be worth finding some kind of parsing library for handling incoming requests to cut down on boilerplate code for new projects. But if you’re looking for a way to interact with Google resources from the outside, this is one way that has worked well for me.
Starting off with this project, I knew it would need a strong admin interface. One of the problems I mentioned initially is that all of the PD troubleshooting and administration went through me. That became a big burden, especially when presenters needed something done.
The new platform includes a SuperAdmin area which can be used to manage events and users. This role can be given to anyone, so it’ll be nice to have some other team members who are able to make system-level changes.
Navigation
The navigation menu includes two options for SuperAdmins: Event Management and User Management. I decided to split it into two different views because they were getting very complex when combined. SuperAdmins can also create events, just like presenters.
Event Management
SuperAdmins have access to all events in the system. They can see registration details and update attendance. From time to time, a presenter may miss a person who was actually there, so the admin can go in and mark that person as having attended after the fact.
The SuperAdmin event controls are nearly the same as the Presenter controls with two major differences:
First, SuperAdmins can add any user as a presenter to an event. Presenters can only search through users who are already presenters in the platform. SuperAdmins override that and can add any registered user. When that user is made a presenter, their user role is also updated and they’ll be granted the Presenter permissions detailed in my last post.
Second, SuperAdmins can completely delete events. Presenters could set an event status as ‘inactive,’ which hides it from the UI, but doesn’t remove any of the data. The SuperAdmin can nuke the entire event along with registrations, attendance, and other associated data.
Because the deletion is completely irreversible, this has an extra confirmation step before actually performing the operation.
User Management
When a user registers for the site, their account is set by default to User. This limits what controls the general user has (again, detailed in another post) and lets people sign up without interaction from presenters or admins.
There are times when users need to graduate up a level. The User Management area allows admins to change user roles with a dropdown menu. This role change is immediate and on the next login (or page refresh), the user permissions will update.
SuperAdmins can make edits to users within the platform. Their login matches their Google account, but maybe they want their first name to be displayed differently. Or, more importantly, they didn't register for an event that they actually showed up for. If an edit is necessary, the SuperAdmin can do all of those things in the sidebar. This is the same sidebar mentioned in the post on presenters with different form fields thrown in there.
I decided not to all admins to disenroll a user from an event because we want to be able to look at what was registered for vs what was actually attended. There isn't a view for this report yet, but we'll be able to do that in the future.
In the end...
This was a project of necessity to help us move forward as a cohesive team but it was also one of significant learning for me. This is my real first full-stack project from the database up to the frontend. The entire project is on Github, and while it isn't ready for general distribution yet, you can look at the design from the code level.
There are several features I've added since starting these posts (duplicating events, UI updates, mobile styles, accessibility styles, etc) that I won't be visiting specifically. I'm going to do one last post on technical aspects and explain some of my design and code choices if you're interested.
If this is something you'd like to consider using in your school or district, I'd be happy to set up a demo to walk through the platform as a whole. Get in touch if you'd like to do that.
The word “presenter” is really loose in this system. This can be a person who is leading a one-off workshop. It can also be someone who can answer questions about a program. Or it can be someone who is facilitating a multi-week learning extravaganza. At the end of the day, a presenter in this system is someone who is responsible for certifying participants have done a thing.
I mentioned in the last post we want to move toward competencies and to encourage the coaching aspect of skill development, presenters play a crucial role in the professional learning system. I’m getting a little ahead, so let’s back up.
FREEDOMMMMMM
Presenters start with a little more freedom in the site. They have two additional menu items: Presenter Tools and Create. This is a smaller group of people who will make things happen, so they need more tools in their kit to do those things.
Home
The presenter is a more powerful user. So, their home page is the same as a general teacher. Notice that the home page now only loads future, active events. Their navigation menu has new options, though.
Create
By default, a Presenter can create a new event. An event can be a one time workshop or something spanning a longer period of time. The type of event is determined by the presenter, so the form helps with that. This also helps us categorize which types are more or less popular, which ones get more registrations, and which have higher rates of completion.
Creating an event sets it to Active by default and people can begin registering. On first submission, the person completing the form is set as a presenter. This will need to change because we'll eventually have secretaries or assistants creating events but we don't want them listed as the main point of contact.
One point I'm particularly happy with is setting the event type and location fields. I took major inspiration from Jonnie Hallman, a developer who write extensively about his design and build processes. His post on building inline forms helped me think through how to handle this part well.
When the page loads, it grabs current event type options (In person, Google Meet, Webex, etc) and throws them in a dropdown menu. The same goes for locations. These include metadata that can be used later in the UI, but for now, it's just to help categorize our events.
The big question was how to handle a situation where the type or location didn't exist. Using an inline form, I was able to allow the presenter to create a new type or a location on the fly and dynamically update the menu.
After submitting the event, a simple modal confirms (or rejects) the submission.
To do
Better validation in the UI to make sure errors are caught early.
Presenter Tools
Here’s where the rubber starts to meet the road. Once a presenter has created (or been added to) a event, they are able to see more information and even change some of those details.
In the Presenter Tools, the user is given a list at the top of the page of each session where they are listed as a presenter. Clicking on an event title loads the registrations and enables editing tools. It's important to note that this view does not filter by date or active status because we want presenters to be able to make those changes.
Edit Sessions
In the tools section, a presenter can open a sidebar to make small adjustments to the event. Things like the title, meeting location, description, etc. Date changes are also supported right now. Using the same inline form as before, a slider will pop out with a form they can edit. Current values for the event are pre-loaded into each form field.
To keep the sidebar from scrolling to the moon and back, different edits are split into different actions. The only edit not supported for presenters right now is the ability to edit who is presenting. There's no method for getting users who are already presenters, so that needs to be built out before those changes can be allowed.
Another helpful tool for presenters is a clean method for adding resource links to the event. In the edit form, current links are shown as well as a simple form to add a new link. The link categorization isn't really used yet, but it will allow us to use that metadata later.
To do:
Edit event presenters by only displaying users who already have presenters status somewhere else.
Remove links from the event.
Communication
Often, presenters will want to get in touch with registrants before or after an event. When a presenter clicks on an event in their list, they’re given a snapshot of the registrations at that moment along with a couple of tools.
Presenters can open an email to all registrations for quick communication from here. Emails are sent by whatever is set up on their computer (Gmail, etc) so the app can stay simpler. Getting into sending automated emails is hairy.
They’re also able to see the registrant status. Remember in the last post how one session was marked “Registered” and the other was marked “Attended?” This is where that happens.
In reality, some of the training we’ll be facilitating is just that: one time training. After an event, the presenter can come in here and mark an individual has having participated or make those marks in bulk on the registrations list. This will flip the status for users and they’ll be able to get their documents.
At other times, we want to see growth and competency. So, a presenter may have a long-running event - weeks or months - and as participants show their skills, the presenter can come in and mark those people off. The asynchronous, intentional marking of completion will help presenters take action in working with their participants and signal to staff that we want to help them make substantive change in their practice.
This was a huge update to functionality, so I'm going to stop there. There will be at least one more post detailing the admin tooling. Lastly, I'll probably do a big writeup of the technology behind this system and give links to source code so you can dig in and take a look.


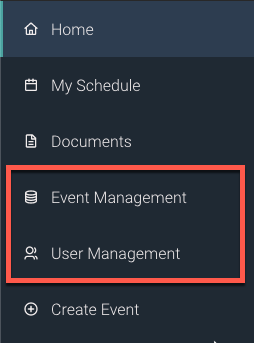


I always appreciate your thoughtful articles, Brian! I’m still trying to formulate my opinion on Chat GPT and related AI tools.