Posts
This spring and summer, I've taken on a full-blown re-write of our PD registration and management system. Our current system is a collection of centralized Google Apps Script projects which create, share, and manage all event folders, documents, and records. It's worked well over the last two years but there's been a single point of contact for everything: me.
Now that we're getting more people involved in professional development, it's time to have a more robust, user-based system for creating and managing events as well as teacher signups and recordkeeping. This post is going to explore the first role: Staff Users. These are teachers or staff who are registering for and tracking participation in events.
Home
The home page shows logged-in users all district events. Their own state is shown on course badge as either Attended or Registered. Clicking on a course shows specifics (presenters, location, etc) in a sidebar. If a user registers for an event, their course badge updates dynamically which prevents multiple registrations by the same person.


To do
- Google calendar invitation to events
- Only show upcoming events
- Disable registration on events with no remaining space
Schedule
This is essentially a filtered view of workshops or events the staff member has signed up for. Each event's status is shown and details are displayed in the sidebar when the event is clicked.
To do
- Custom date filtering
- Expand view to remove a click for details
Documents
We've had a digital sign-up tool in place for several years. The biggest improvement I'm excited about is the documentation processing. Any registration is put into a database which can be queried and filtered by a bunch of parameters. This allows me to build out a nice spot for teachers to find their documents on demand and print whatever they needed rather than waiting on us to generate a PDF from a spreadsheet and send it off.
This page shows the which events have their participation or completion confirmed by the facilitator. The reason this confirmation step is so important is that we need to move away from being trained and move toward showing competency. So, a workshop might be a part of a program, but it does not guarantee that the staff member has actually improved.
This is a big shift for us. In the past, we used a standard feedback form. But, given the variety of presenters working with us, we wanted to give people more freedom in how they collected feedback. Also, since we were generating all the feedback forms centrally, we found presenters were less likely to actually read the feedback because the questions may not have been relevant to their own goals. At worst, participants were filling out multiple forms at events - one for us, and one for the presenter. Taking the form out of the documentation flow simplifies for everyone.
Without showing the presenter interface now, this view is any confirmed event for the user. They are also given a couple snapshots at the top: total registrations (how much am I signing up for) and Professional Growth Points (PGPs) earned for completing requirements.

From here, they can either print a summary of all activity on record or print individual documents as needed. All of these details are generated by the database. The record is also validated by the server and database rather than taking input directly. There's no more wondering when an event was or how many PGPs it was worth because it's all driven from a single source of truth.

That's a quick view of a portion of this site that's just about finished. But there's a lot happening in the background to make that work and to allow different people to manage. In future posts, I'll detail Presenters and SuperAdmins and their roles on the site for creating and managing events. I'll also get a technical post published on the technology used to build this as well as deploying.
Several years ago, my wife took a short beekeeping course with her mom. They tried a hive in their backyard a few times, but the colonies never survived. The hive sat unused for at least a year until last May when a swarm decided to move in.
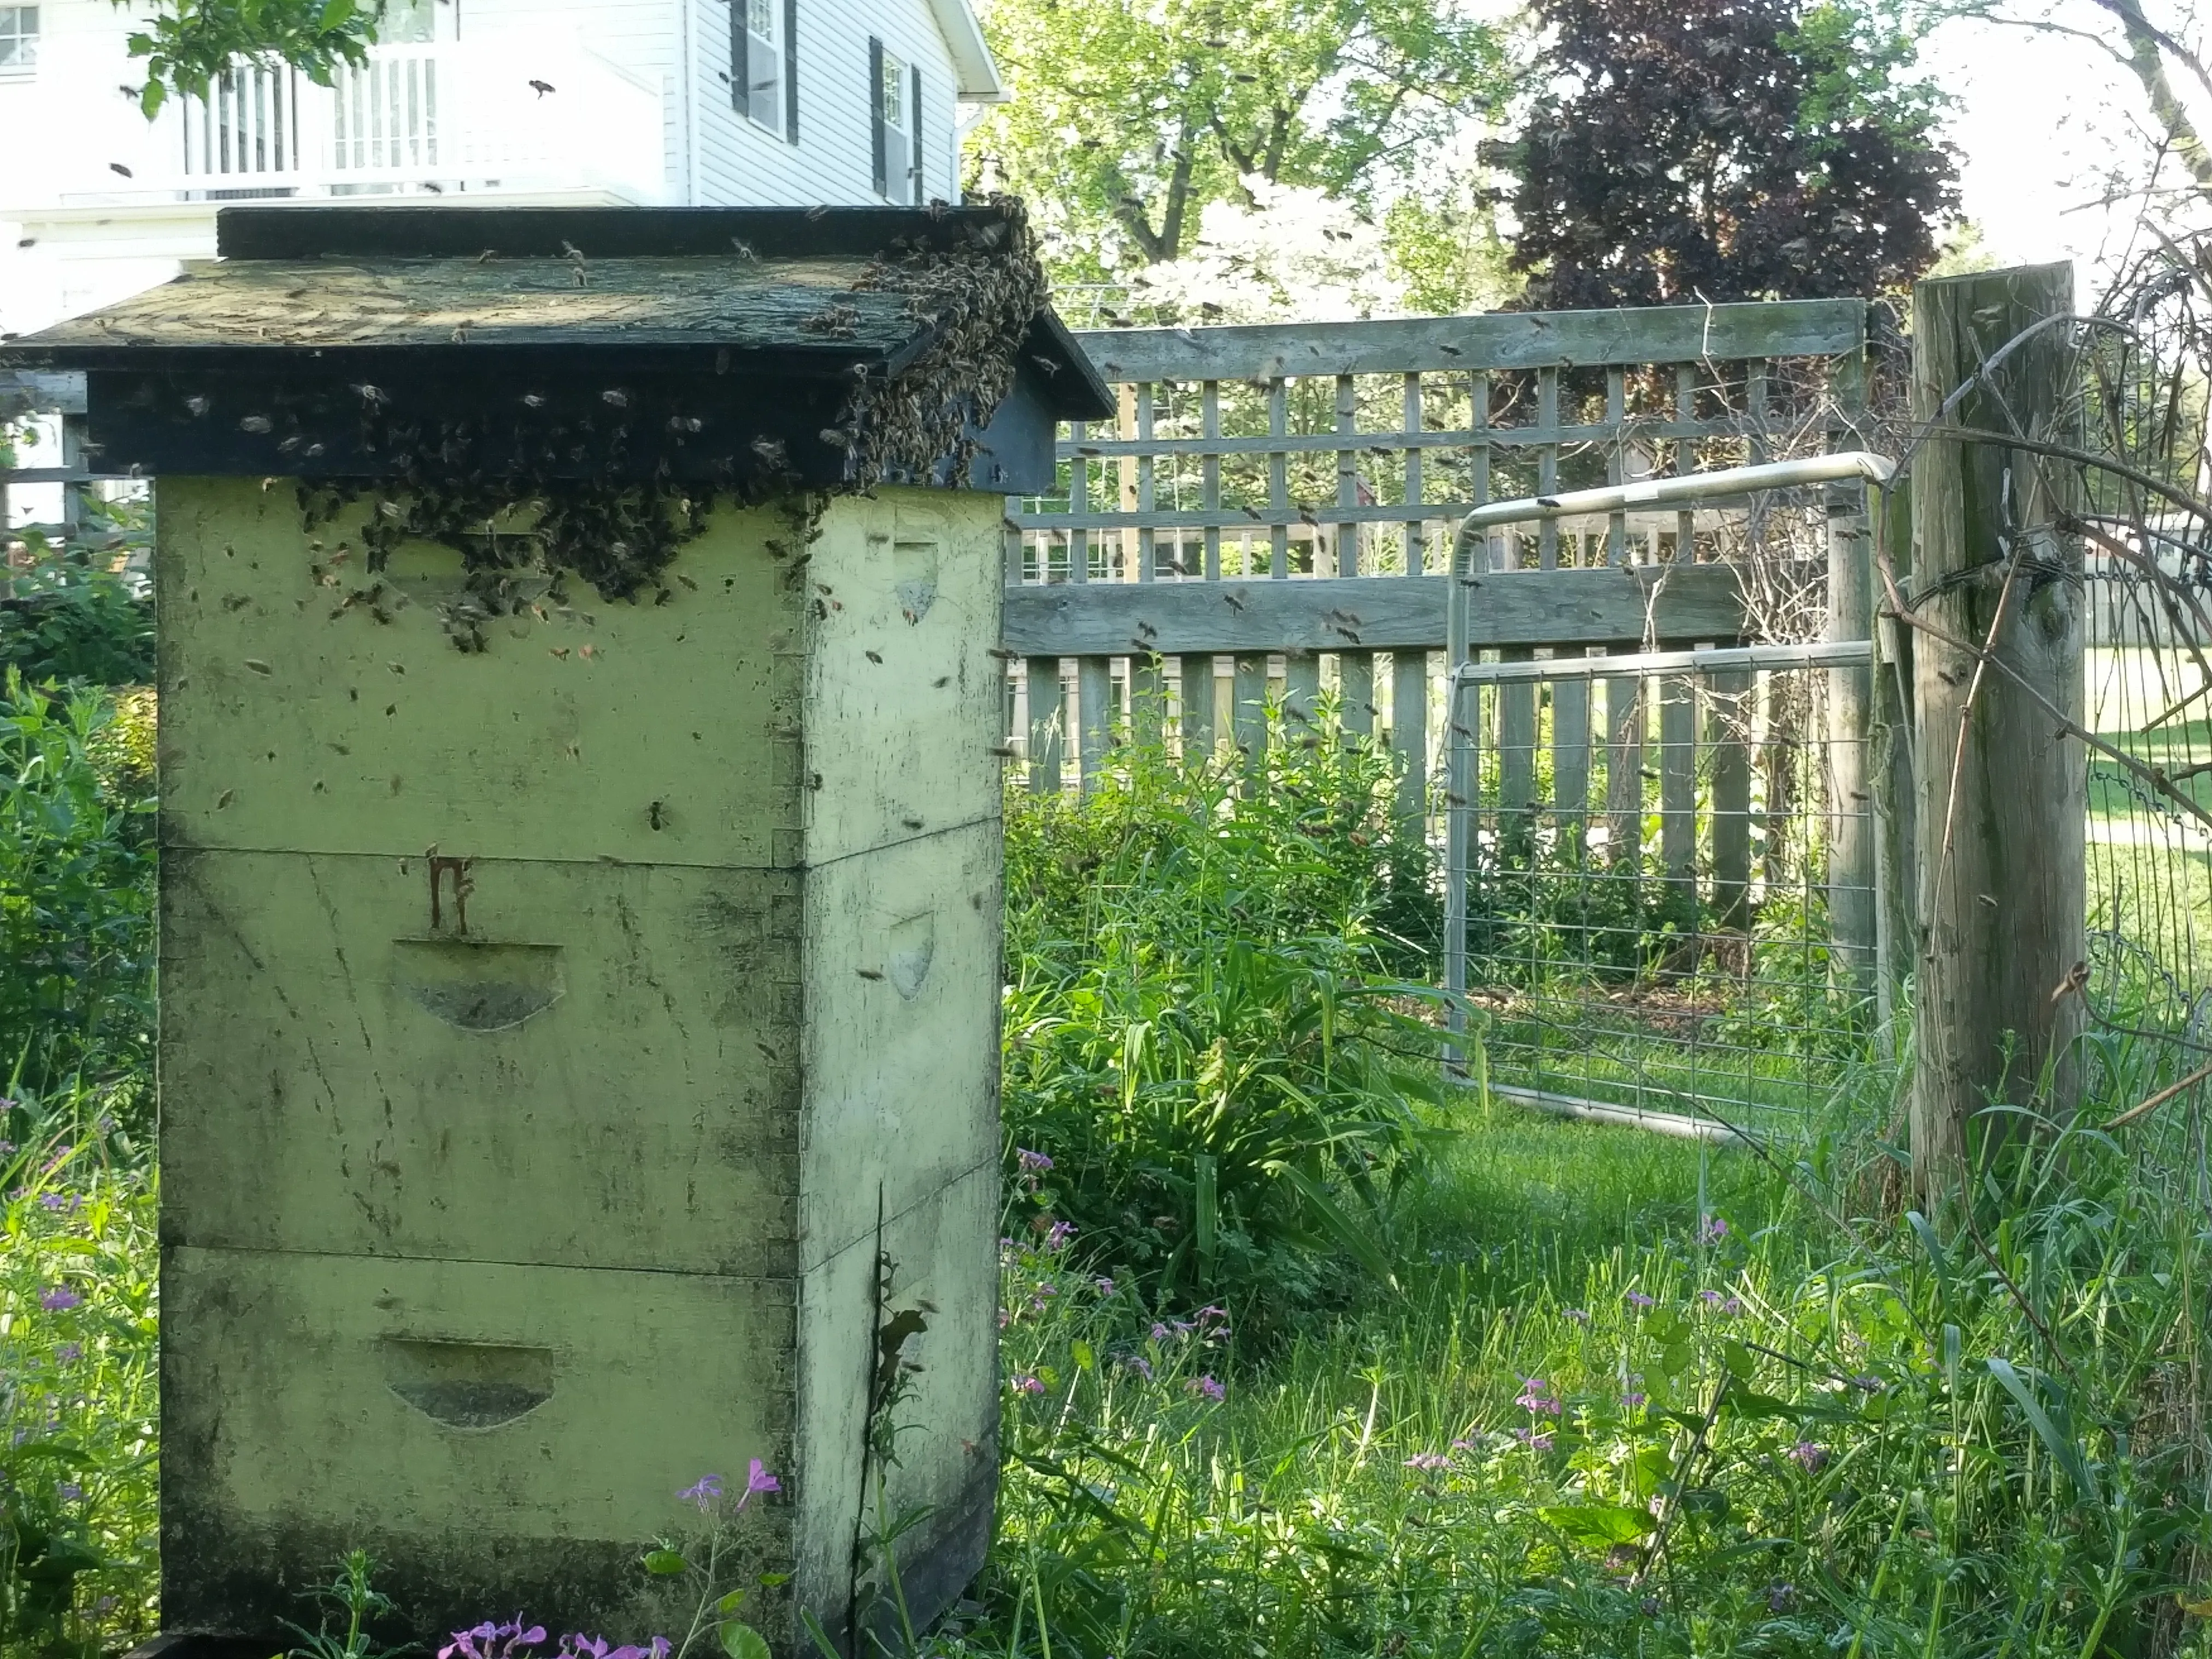
I decided that I wanted to try my hand a keeping some bees. I couldn't start last year because we were in the middle of building the house. I spent last winter reading and watching videos as well as talking with my friend Phil who keeps bees at his place.
This spring, I set out several swarm traps - boxes that are ideal for swarms because they're cozy and smell like bees from old wax and some lemongrass oil as bait. Most forums say one in three traps is successful and I was hoping to catch at least one.
I caught three over the last month.

I immediately fell in love with this work.
Watching these insects work is...overwhelming and humbling. The colony doesn't need me at all, but they don't mind the help. I'm allowed to peek in the box from time to time to make sure they're healthy. I can provide shelter and a safe place to build out a permanent home. In return, they'll pollinate the gardens nearby and share their extra honey.
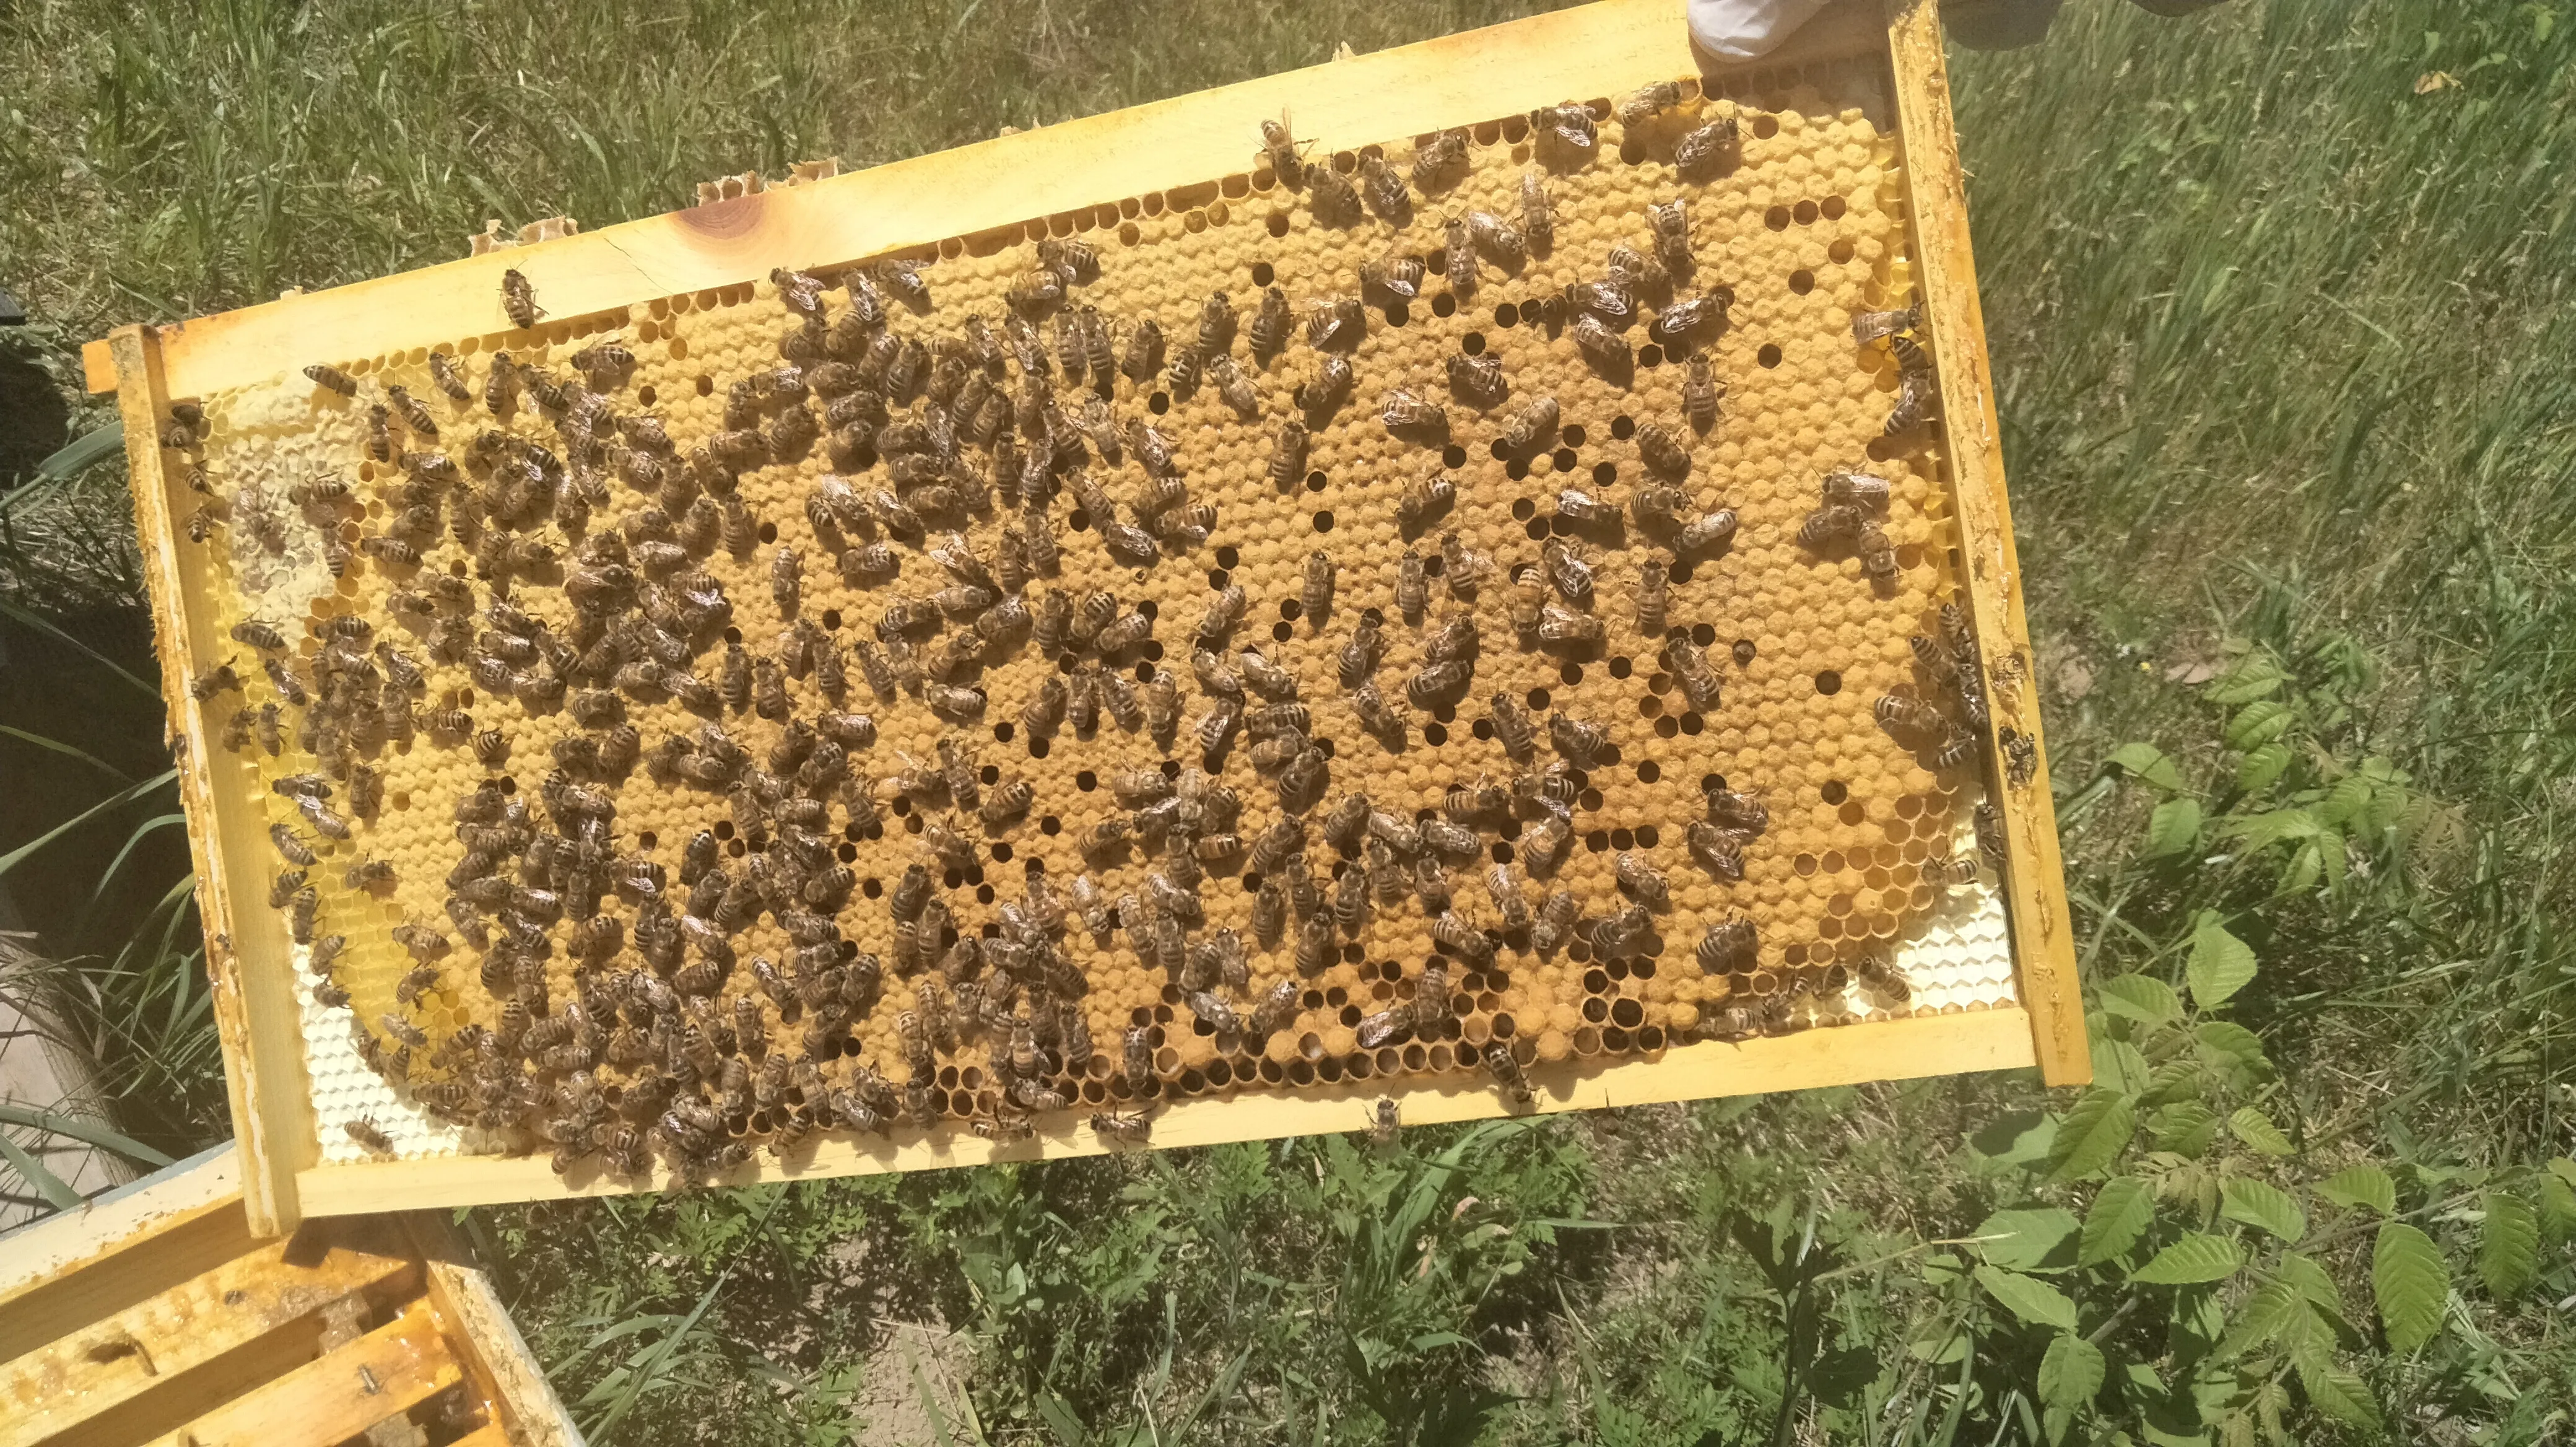
As a new keeper, I'm learning their signals. I'm watching for behaviors that can tell me what they're doing and what I can do to help. This is a hobby of observation...and at the end of the day after dinner, sometimes I just go sit and watch and enjoy the hum.
One of my favorite things about Google Apps Script is that I can get information from an API and write it directly to a shared document or spreadsheet. Information is collected automatically and immediately available to a group of people working on that same doc.
It's not uncommon for these requests to come back in paginated form. Meaning, if your request has 100 responses, they'll come in batches of n size instead of all at once. To demonstrate, I've made a video showing how I use a script to handle requests to Canvas.
If you want to play with it, here's an example you can start from:
We're in a situation where staff are overwhelmed. Teachers are feeling under water all the time, trying to make materials to support online learning. I'm in the position to provide those supports, but we're looking for two different things.
Money solves problems, but we can't buy a thing to get out of this. There is no app. There is no platform. There is no "if we just..." solution.
The things that will improve online teaching are changes in practice. Pedagogy needs to be adjusted. How we present, assess, and follow up on information needs to be adjusted. Some of these things are small tweaks (ie, recording simple videos) and others require deeper discussion, reflection, and processing.
It Sort of Worked...
In the spring, we were "all in this together." We focused on making the best of a bad situation. We made sure there was a significant allotment of time each week for development, discussion, and support at the department, school, and district levels. Development was prioritized and we made huge gains.
Consistency, predictability, and availability were all critical components of making sure we made it through the semester. At the start, all of our hopes were high that the fall would bring some resolution.
As the semester went on, it became more obvious that an online fall semester was going to be likely. Instead of carrying the support system forward, we reduced the time available for staff to receive help or discuss strategy in small groups.
Fragmentation
Losing dedicated support time has left us in a rut. This is long term, like it or not. Instead of making progress, I feel like we're spinning wheels and flinging mud to try and get some traction. Evidence shows that PLC-based support, marrying tech, practice, and content, provides significant benefit to staff development which isn't surprising. We had a modicum of that in the spring when we focused on department growth around specific goals.
Since losing focus, reaching staff at any level has become even more challenging. There's no simple solution and the options I'm trying to provide aren't winning any converts.
Baby Steps
I work with a great partner who has brought some great ideas. Some things that seem to gain a little bit more traction seem to be:
- Themed activity collections. Resources for special events, lately. Dr. Martin Luther King, Jr Day and Inauguration Day packs have helped provide staff with ready-to-use materials that promote good online instruction.
- On-demand PD. We've started creating 20-30 minute YouTube PD videos which dive into instructional best practice in our LMS or using other district tools. They're interactive in the live chat during the stream, but are archived for later if people can't carve out the time to watch live.
- Social media presence. I'm not a facebook person, but it's where our teachers are. She's taken steps to be more proactive about getting materials in front of people where they are.
We can't force engagement. I cannot mandate growth. But we do need to help drive a desire to improve now. We're online and probably will be for some time. Moving out of emergency mode isn't an option. Hopefully we can get things moving in a direction where, despite fatigue, we can get people to engage and move with us.
_Hiking by Franck Michel is licensed under CC BY_
In 2013, I wrote up how to record Google Hangouts in high quality for podcasting or whatever. This post is how to essentially do the same, but for piping audio into Google Meet from any source on your computer.
Just like before, this article is written for Mac OS because that's what I have. If you know of how to do this on Windows or Linux, leave a comment.
Sound settings
Open up System Preferences and go to Sound. Set:
- Output: Soundflower 2ch
- Input: Soundflower 64ch
Ladiocast Settings
Open Ladiocast and set:
- Input 1: Soundflower 2ch (get the computer audio)
- Input 2 (optional): Your microphone
- Main Output: Soundflower 64ch
- Aux Output (optional): Built-in output
Google Meet settings
In your Google Meet, open up your sound settings.
- Input: Soundflower 2ch
- Output: Sounndflower 2ch
Ladiocast takes all of your inputs and mixes them into one track that can be sent somewhere. This is a little wonky because we're taking system output, sending it through Ladiocast to get a new input, and then piping that into the Meet. If you set it up right, you should be able to play any audio and hear it from your Google Meet.
We're getting ready to launch a digital teaching and learning course for staff that is based on the TPACK framework. A few years ago, we started our 1:1 training by coaching teachers through using SAMR to design lessons which really use the technology in new ways. This time, we're having teachers do more metacognitive reflection on their own practice with TPACK as a model for thinking through content, pedagogy, and technology's impact on their practice.
Matt Kholer has collected several surveys which can be used to gauge each component of TPACK. We modified a 2009 instrument written by Kohler (and several others) into a Google Form for teachers to take before and after the program. For our course, we're only focusing on technology and pedagogy and coaching people through applying their content knowledge.
Our goal was to have teachers compelte the form and then receive an email with their survey results. Once the form was submitted, the sheet needed to average each domain, create a chart, generate an email, and fire it off with the chart included in the body of the email.
I started with Martin Hawksey's posts on email dashboards from Google Sheets using Apps Script. The main issue I ran into is that the radar chart we were hoping to use had to be rendered into the spreadsheet to get all the labels and formatting correct. Even calling the image directly from its URL was problematic. Specifically, if multiple people submitted at once, the charts could get combined in unexpeected ways, sending people wrong information. I looked into using Apps Script's LockServiceto limit execution, but honestly, I couldn't spend a whole lot of time on getting this running.
Martin suggested using quickchart.io to generate charts through an API endpoint. It's based on Chart.js, which I've used in the past for an action research summary.
This ends up working better because I don't need to read the sheet twice to generate a chart. I can take the processed data object right from the form responses, hit the API with some config in a JSON string and get an image which is appended into the email.
The Code
function processFormValues(row) {
let obj = {
"email": row[1],
"tk": row.slice(2, 8),
"pk": row.slice(8, 15),
"tpk": row.slice(15, 21),
"tpck": [row[row.length-1]],
}
return calculate(obj)
}
function calculate(obj) {
let avgObj = {}
for(var key in obj) {
if(key === "email") {
avgObj["email"] = obj[key]
} else {
var length = obj[key].length;
var avg = (obj[key].reduce((prev, curr) => Number(prev) + Number(curr), 0)) / length;
avgObj[key] = avg.toFixed(2)
}
}
return avgObj;
}
function getChart(chartData) {
const baseUrl = `https://quickchart.io/chart?bkg=white&c=`
const params = {
"type": "horizontalBar",
"data": {
"labels": ["tk","pk","tpk","tpck"],
"datasets": [
{
"label": "Self Assessment",
"backgroundColor": "rgba(54, 162, 235, 0.5)",
"borderColor": "rgb(54, 162, 235)",
"data": [ chartData[1], chartData[2], chartData[3], chartData[4] ]
}
]
},
"options": {
"plugins": {
"datalabels": {
"display": true,
"anchor": "end",
"align": "end",
"color": "#000",
}
},
"elements": {
"rectangle": {
"borderWidth": 2
},
},
"responsive": true,
"scales": {
"xAxes": [{
"ticks": {
"display": true,
"beginAtZero": true,
"suggestedMax": 6,
"stepSize": 1,
},
"gridLines": {
"display": true,
}
}],
"yAxes": [{
"gridLines": {
"display": false,
}
}]
}
}
}
try {
let blob = UrlFetchApp.fetch(baseUrl + encodeURIComponent(JSON.stringify(params))).getAs('image/png');
return {'url': baseUrl + encodeURIComponent(JSON.stringify(params)), 'blob': blob};
} catch(e) {
return e.message
}
}
function onFormSubmit(e) {
const ss = SpreadsheetApp.getActiveSpreadsheet();
const calcs = ss.getSheetByName('calculations');
const headers = calcs.getRange(1, 1, 1, calcs.getLastColumn()).getValues()[0];
try {
let scores = processFormValues(e.values);
var writeRow = []
for(var i=0; i<headers.length; i++) {
writeRow.push(scores[headers[i]]);
}
let nextRange = calcs.getRange(calcs.getLastRow()+1, 1, 1, writeRow.length).setValues([ writeRow ])
let chart = getChart(writeRow)
if(chart) {
let emailImages = {};
emailImages['chart'] = chart['blob'];
let emailBody = `...your email template...`;
emailBody += `<p align='center'><img src='cid:${emailImages["chart"]}'></p>`;
MailApp.sendEmail({
to: writeRow[0],
subject: 'Your survey results!',
htmlBody: emailBody,
inlineImages: emailImages
})
calcs.getRange(nextRange.getRow(), 6).setValue(chart['url']);
}
} catch(err) {
calcs.getRange(calcs.getLastRow()+1, 1).setValue(err)
throw new Error(err)
}
}
The result
As form submissions come in, the sheet generates the average for each category and then uses those values to send a request to the quickchart API. The image blob is captured in an object and sent inline to the user who submitted. It runs in 7-8 seconds consistently, with the lag coming from sending the email.

Our email template includes an explainer on what each domain is meant to describe so participants can think through their survey before coming to the live session. We'll use the same form at the end so they can compare their results as part of the final reflection.
This is a revisit to a post I wrote four years ago in which we used a spreadsheet and Google's nifty little hidden JSON data endpoint to serve data to a Chrome extension.
Without going too deep, the extension needed to be updated. I took this chance to refactor using modern Javascript rather tha jQuery and to try out the SpreadAPI plugin for Apps Script by Mateus Zieliński. In this post, I'll go through each layer of the application in detail, explaining how everything plays together.
Google Sheets
At the risk of using a spreadsheet to do something a database should do, we hold all of our available professional development in one master sheet. This takes data from a Google Form and makes sure we're using a consistent format. For this project, I'm interested in the start date, the title, and the link to the corresponding calendar event.
Initially, we used Google's hidden JSON endpoint that's included with a published sheet. The problem with this approach is that each cell is returned in the response rather that each row. So, when I call the data, we get nearly 700 responses rather than the 40ish rows we have.
Yeah, that's not going to work.
This is where SpreadAPI steps in and helps out in a big way.
SpreadAPI
This is a little Apps Script library which allows your sheet to act as a JSON endpoint. It supports basic CRUD operations (GET, POST, PUT, DELETE) out of the box and even includes some user authentication baked in. To use SpreadAPI, you simply grab a minified version of the script form the author's repo and add it as a script file in your project.
Since it's a published API, we don't want just anyone posting or reading data from the sheet. Our master sheet has ~17 columns of data and we cannot limit which of those are available in the API without some extra processing that's outside the project scope at this point. Instead, we set up a User in the library settings which can only read access from the sessions list.
Each User has a name, key, and access params which can be defined. This means you can distribute different keys for different programs accesing the same data.
Here's an admin, who would have all permissions on all sheets:
User("admin", "SomeStr0nGP@55word", ALL)
compared with a user who can only GET from one sheet:
User("readOnly", "SomeR3@d0nly", { Sheet1: GET })
Now that we have users set up, we can start using the sheet as an endpoint.
The Extension
The extension is written in plain Javascript and grabs data from the sheet before populating the popup shown. I moved it from jQuery and refactored it to use async fetch calls.
Apps Script API endpoints are handled by a doPost function which only handles POST requests. The fetch calls are a little weird as a result. To get data, we fire off a POST request within fetch that has a payload which defines the query method to SpreadAPI.
const url = "yourWebAppUrl"
let payload = JSON.stringify({
method: "GET",
key: "yourPassword",
sheet: "Sheet1",
})
let fetchOpts = {
method: "POST",
headers: {
"Content-Type": "application/x-www-form-urlencoded"
},
payload : payload
}
fetch(url, fetchOpts).then(
resp => resp.json()
).then(
data => console.log(JSON.parse(data));
);
Once we have the data as a JSON object, we filter it to only display the next seven days of workshops for teachers.
A benefit of doing this in the background script is that it can also run in the background before a user clicks on the extension icon. It will poll the sheet for changes and then display a "NEW" badge if a session has been added.
We also do some optimization using chrome.storage.sync to keep a cached copy for display rather than polling the sheet at runtime. If new data is available, the storage object is overwritten in the background.
Challenges
Async work is challenging for me. A lot of my time refactoring was flow control, making sure data I needed was actually there when went to operate on it.
Specifically, I started storing a timestamp for the last time the sheet was updated. Moving from localStorage to chrome.storage.sync for caching made sense, but it was difficult because getting inforamation out of chrome.storage is asynchronous. I ended up adding an explicit function to get and resolve the Promise in the right order.
async someFunction() {
    function getTimeStored() {
        return new Promise((resolve, reject) => {
            try {
                chrome.storage.sync.get('last-updated', function (data) {
                    resolve(data['last-updated']);
                });
            } catch (ex) {
                reject(ex);
            }
        });
    }

    let timeStored = await getTimeStored()
}
It bent my brain a little bit, but it made the extension more helpful because we had a problem with repeat "NEW" notifications when teachers switched machines. This syncs their information across all computers they would log in on at any point.
The Result
The finished product is quite simple...a list of upcoming events in the next week, each linked to a calendar event with all the details. The goal was simplicity and utility. We're also able to cut down on emails sent out with the same information.

I think, for me, it gets back to putting information in front of people rather than always expecting users to go find information. It's much more like the RSS feed approach, where my reading is delivered consistently. When I want to read it, I know where to go.
In this case, we're helping take the load of remembering development opportunities off of our staff and waiting quietly until they're ready.
We started our school year today. We have a split group of teachers who are fully online and a group who is hybrid, two days in school and three days online. To make our support manageable, my counterpart and I have worked to infuse systems that support both 100% online and the hybrid model of instruction.
With so much uncertainty, it's hard to push teachers to completely rethink how they approach instruction. Building a foundation on something familiar is an easier ask than jumping into a brand new paradigm with very little time to prepare ahead. What I've ended up seeing is a group of teachers, not just in our district, who are trying to re-create the school day in an online space as closely as they can. So, a group of students is assigned work on Day A and the second group sees the same thing, but on Day B. Time is dictating student access to information, given out at the discretion of the teacher.
That's a bad model, but it's especially bad when you're online or in a hybrid.
It's an Equity Problem
Directing information in this way assumes all students can access that material on your scheduled. In the traditional school strucutre, that's less bad (though still less than ideal) because we have that time with students face to face. It's expected and generally followed for the larger population.
Online, that's asking a lot.
Some families stayed online because they can afford to. It's a luxury they can take advantage of. Others are all online because of necessity. The rest are hybrid for the same reasons. At the end of the day, we have a diverse population with at minimum three different paradigms for schoolwork. That doesn't include family dynamic, Internet access patterns, work patterns, and a number of other situations.
Assuming a typical school day will work as an online school day ignores the varied situations our students are in. Flexibility helps mitigate those differences. Equitable access to content starts with flexibility in how a student both receives that material (assignments, reading, videos, etc) and how they respond to those prompts.
It's an Instructional Problem
Equitable access to information isn't a problem with technology. It's a problem with our paradigms for designing and implementing instruction. Teaching online frees you from the notion of "all here, all doing" when it comes to information transfer. The simple act of offloading the information iteslf into the personal space allows students to develop and practice some agency in their learning.
The most frequent argument to this idea is, "But they'll work ahead!" It amazes me that teachers are worried about students working ahead.
Information isn't the only part of teaching. It's a starting point. Students can watch a year's worth of my biology videos in a few hours, but they're not going to learn anything important unless I design meanginful, engaging activities and tasks that forces them to use what they've watched.
This is an instructional problem. It's a problem that we equate information transfer (I talk, you listen) with learning so closely that we cannot fathom posting videos at the start of the week for everyone, regardless of their class day. It's a problem that we worry about students moving forward in the class on their own time because they have time on Monday to do the work you were planning on assigning Wednesday.
Working online provides a great intervention to the idea that learning happens on the teacher's time, not on the student's time.
It's an Assessment Problem
If your instruction online is crippled from the start because you don't have a way to proctor students during tests, you've got a bigger problem with assessment. Practice problems cam be gamed. "Skill games" don't actually measure skill (yes, I said it). Assessment is a strategy that informs the student of where they are and the teacher of what you should be doing differently. It takes serious planning. It takes skill to create useful, valid, reliable assessments.
It takes even more skill to design assessments that only show student learning better when they're done online.
Giving a test online (if you want to call it a test) allows students to use the vast amount of information on the Internet as a resource. This is a good thing. Your assessment strategy should change in such a way that if a student does Google the answer, their answer only gets better as a result. Open-ended questions, inquiry, allowing students to define their own performance criteria takes the stress out of writing the perfect multiple choice question.
The Hard Truth
The fact is that teaching online should force a teacher to look into a mirror (or webcam) and question everything they've thought about teaching before. If time and place are non-issues, if the vast swath of the Internet is open for searching, and if you had the freedom to design and use it how you wanted, what would be possible? What would you choose to do instead of just do?
It's scary. It's often frustrating. It's definitely humbling.
The featured photo is Space by Ikhlasul Amal is licensed under CC BY-NC
This fall, I started to revisit my personal productivity habits. We lost a team member last spring and we won't be replacing that role, which means I have more to keep track of day to day as we absorb some of those responsibilities. I've written before about using plaintext for productivity, which was great. I also keep a couple of notebooks handy for keeping track of longer term items, taking notes in meetings, and jotting stuff down without needing to grab a computer.
The plaintext todo work is great, and I still like it. I like how simple and local it is. The search is blazing when I'm looking for items. I have a bunch of little plugins I've written to help me get more information from a small text file. But, it had some limitations. I had very specific setups that weren't easy to migrate to different platforms. For instance, if I had something I need to add to my list, I couldn't hop on any computer or iPad and just add it to the list. There was an Android client that would help, but it had some weird formatting issues that would throw the entire list formatting off and I'd have to manually edit the text file.
Most importantly, my list was just a collection of single-line things. There was no way to add some story or any kind of background to items. So, something might get put on the list, but several weeks later, the context is missing and I found myself deleting stuff...a lot. I wanted to get back to more descriptive todo items that had context I could use to do better work for the teachers I support.
I listen to a couple software development podcasts and one in particular has done some really good episodes comparing Agile devleopment with Kanban workflows. I've taken a hybrid approach where I use elements from both to make sure my work is managed well, productive, and always contextually aware. I'm not going to do a full blown write up of what Agile and Kanban are, but I'll explain the pieces I've adopted for my own work and why.
Complexity Esitmations
In Agile, you start each task in a body of work is assigned something called a "story point." This describes the complexity of work involved to complete that specific task. This is a relative scale and not linked to how long something will take to do. It's a descriptor of the complexity of Item A compared with Item B.
Setting point values on each card allows me to limit the amount of work I have at any given point. I can prioritize items based on complexity and bang out some work that's been sitting. Or, I can move things out of my mind and focus on a really gnarly problem or project. This is typically a group activity, but it's helpful for me in making solid judgements about what to focus energy on in a given period of time.

Item Flow
Kanban is a Japanese project management system developed by Toyota. In short, tasks should always be categoriezed into some kind of list which describes it's place in the workflow. I'm following a structure similar to what many software teams use (minus a couple lists like testing, code review, etc):
- Backlog: All items start here. They often don't have descriptions and are free to be deleted or promoted as necessary. At most, they have a story point associated.
- To Do: Items only move to this column when I have a full description of the problem, including possible solutions to explore. This ensures that any items moved into my work list are fully formed ideas with solid rationale. If I cannot do that to an item, it stays in the backlog for a little longer or I delete it. At this point, the item has a solid complexity esitmation.
- In Progress: Items that are actively being worked on. This column could change hour by hour or rarely depending on the complexity of the work. I'm adding comments at this point, not updating the card description. If the scope of the card needs to change, it moves back into To Do or into On Hold.
- On Hold: This is the parking lot. Either a card needs more thought because I've run into a gnarly issue or I need input from someone else. In short, these cards are probably good ideas, but I can't move forward for one reason or another.
- Completed: The task as written is complete, solving the problem outlined in the description.
Managing Work
I've gone back to using Trello as my work management platform. They have a solid web app and a good mobile app, so my cross-platform issue is immediately solved. It's also nice because I can write long descriptions of problems, add checklists for specific tasks within an item, and I can even share boards with colleagues to work together on things.
I've taken an added step to help me manage the complexity of my work day to day. I have set upper limits on the total number of points which can exist in any column. Each card is prefixed with the point value in the title so I can quickly scan and see how much complexity I'm commiting to for a period of time. For the moment, I'm limiting myself to, at most, 15 points in my To Do column and 11 in the In Progress column. This has the double-benefit of keeping me realistic about how much I can tackle and making sure I actually accomplish tasks.
This isn't perfect by far and I'm losing out on the collaborative nature of project planning and completion (though I still work with people most of the day). It's a major improvement over what I was doing even though I've lost a little bit of data ownership. I think, in the long run, this is going to help me stay more on top of work and be more choosey about what I commit to.
My district is entering a phase where students are in one of two situations: fully online or a hybrid with two days in person and three days online. The goal of this structure is to provide a safe space for students who need it without mandating that all students come back to the building and create a new unsafe space.
I've been thinking hard about how to support this new structure. Trying to work the old school model into a new structure is going to cause headaches. The lowest bar is often one of the worst, even though it's an attractive option when you're under time constraints and high stress in new situations. To that end, I've been trying to pare down what I would suggest if I were teaching classes of my own this fall.
Simplicity First
Complex systems which evolve from simple systems often work well. Complex systems developed without simple implimentations often run into the ground, hard. Starting simple and choosing two or three solid instructional methods will help teachers make connections and teach new material.
There will be a time when you need to figure out how to accomplish tasks X and Y without letting A, B, and C fall apart, but it isn't at the start of the semester. Those acrobatics come later. For now, consider how you're going to introduce concepts, close gaps in understanding, and then build on those ideas.
In Education and Experience, John Dewey (yep, I just pulled that card out) argues that experiences should build on one another and drive students to want to know more. This is critical in building self-regulation habits, espeically at the high school level.
Well Defined Material
You are not going to be able to "cover" or "hit" the same amount of content you did before March. It just isn't feasible given the time delays and other constraints of teaching fully (or even partially) online.
Deep breaths.
You should start by identifying the absolute essentials for your content. If you would typically explore 15 content standards in an in-person semester, cut that down by two thirds. You might be at a good starting point.
Not only should content be pared down to essentials, it should be explicitely and repeatedely shown and explained to students. This opens up a number of opportunities from direct discussions of material with students (imagine no more, "what are we learning today?" It can be your reality.) to fully-fledged standards-based grading.
As a fringe benefit, reducing your scoped material gives you a soild guaranteed curriculum which can be expanded based on student interest. Your time is more flexible to follow lines of inquiry and delve into topics or ideas you would normally gloss over for the sake of "covering more material."
Cycles of Learning
Ramsey Musallam uses this term a lot (it's his blog title, after all) and I really like his approach to flipped learning. Instead of preteaching with a video and assuming you know what students need to know, be patient and wait for those misconceptions to expose themselves. Then you can make a short, targeted video to close those gaps.
When you're fully online, it's easy to make assumptions about where students are before you actually know...where they are. The easy button solution is to make a ton of videos up front only to find later that they don't target specific misconceptions well, which leaves you feeling stressed and rushed to make more videos.
Rather than jump to video as a go-to, invest time in finding other ways to engage students in their learning. Set explorations first which challenge them to think through ideas or topics and express their own understanding before you swoop in with instruction.
Adjust on the Fly
I student taught twelve years ago and I still remember my mentor teacher's response to my very first solo attempt. She observed the class and then brought me a small notepad and said, "Write down three things you're proud of and two things you want to improve." Shen the proceeded to coach me through the first item on my "to improve" list until I felt proud of it and we moved on through the semester.
This changed my life.
It's easy to focus on the terrible lessons. It will be even easier now that many teachers are sitting alone at home or in classrooms. Develop a habit of constant reflection, but start with proud moments and move on to one or two items to improve. Take advantage of any instructional coaches in your district. Reach out to colleagues also teaching online and ask for advice or if they've had the same experience. Ask the students what they think. Find that feedback and take time to adjust as necessary.
There is no top-three list I can give teachers. There is no combination of YouTube channels or websites that will help you teach better. There are chances to move away from time-based, self-contained, content-overloaded courses. Focusing on simple systems which support learning and allow for changes in what "normal" used to be is the best advice I can give heading into the new semester. It's trite, but this really is a chance to rewrite the book on what school could look like.
I hope we take it.
The featured image is solar system by carolinamadruga is licensed under CC BY-NC-ND
It was a busy July, working full time on the house. At the end of the month, we were nearly dried in and have started to shift our focus toward prepping the interior for mechanical work (HVAC, plumbing, and electrical). The house is really taking shape now that the roof is in the building.
Much of the month had evenings filled with checking orders against the master plans to make sure windows and doors would fit the holes we built for them.
Building the second floor felt very surreal, having not lived in a multi-story house in several years.
The trickiest part (to me, at least) was getting the roof trusses set. We rented another big machine to do the bulk of the work in standing up the walls and in raising the roof on the house. This photo really shows the scale of the work we did for most of the month:
As windows and doors are wrapped up, it's feeling more and more like something that can be lived in. Now that I'm back to work, my time on the house is going to slow way down, but that was the goal. We'll be able to hire out much of the mechanical work and then spend evenings and weekends doing things like plumbing and electrical.
Until next time...
Last month, my family broke ground on a new house.

Less than a year ago, we were just toying with the idea of building a house, and now we're actually in the process of building. It's surreal to think back on the original discussion and consider where we've come in this process already.
 | We moved out of this place after seven years.
I work hard to make sure my summers are as tech-free as possible. All of my email is archived automatically and a nice vacation responder tells people to write me again on a given date. I'm focusing all of my energy this year on contracting and building the house with my brothers-in-law as well as assorded friends and other family.

Click through for the full-size picture because it's bonkers.
Most of the work so far has been through hired concrete contractors, but this week lumber started going in, which is a huge burden both on and off my shoulders. Waiting for construction to start was hard, but now that we're moving, it's really refreshing and empowering to be able to do this project with my own hands.
 | Framing is extrememly satisfying to do because everything happens so fast.
I'm trying to remember to document the project. When you're in the middle of it, it feels trite to stop working to take a picture. But, it's not every day you get to build a new house yourself. As of tonight, the first floor is ready for the subfloor and we're getting ready to start framing exterior walls. We're also going to order all of our windows as well as the second floor trusses.
My small team relies on automation to make things run. Part of our PD process is a Google Form workflow that kicks off calendar events, document creation, and email notifications. Since we've moved to online learning, we wanted to update that process to automatically add a Google Meet link for any PD that doesn't have to be in person.
This is important for us so we have consistency and maintainability built in. Taking variability out of event creation and management allows us, as a team of two, to make sure all PD in the district is accessible from anywhere, recordings archvied for later, and a full record of all events run in a given time period.
There are some official Google guides that show how to attach a Meet event to the Calendar, but nothing from the perspective of Apps Script specifically, so that's what I'll show here.
The Setup
Before you start, this relies on the advanced Calendar service. So, you'll need to go into your project, click on Resources > Advanced Google Services and then enable the Calendar v3 API in the project and the cloud console.
Enabling the advance service will give you access to the Calendarobject which can take object arguments, which is what you need to for the Meet attachment.
Data Structure
We use a Google Form to populate a spreadsheet of events. I won't go into how that data is collected or processed, so let's assume we have an object which represents values we'll use in the Calendar event:
const obj = {
    "eventId": "abc123",
    "title": "Some event",
    "description": "Let's do stuff in a Meet",
    "start": "2020-06-01T13:00:00",
    "end": "2020-06-01T14:00:00"
}
To create an event with the Calendar advanced service, we need to build a payload object to send with the request with details for the calendar event:
const payload = {
    "start": {
        "dateTime": obj.start,
        "timeZone": "America/Indiana/Indianapolis",
    },
    "end": {
        "dateTime": obj.end,
        "timeZone": "America/Indiana/Indianapolis",
    },
    "conferenceData": {
        "createRequest": {
            "conferenceSolutionKey": {
                "type": "hangoutsMeet"
            },
            "requestId": obj.eventId,
        },
    },
    "summary": obj.title,
    "description": obj.description
}
The only required parameters are the start and end keys. I also defined my time zone instead of manually adding a time offset, but that's for another post.
Notice the new confereceData ket in the middle of the payload. We define a new request for a Meet and set the conferenceSolutionKey.type value to hangoutsMeet. Other valid values are eventHangout for consumers and eventNamedHangout if you haven't enabled Google Meet in your GSuite domain.
Each request needs a requestId value, so I just use the eventId I already have generated, but it can be any valid string.
Finally, we need to set one more argument before we send the request: { "conferenceDataVersion": 1}. This allows that attached Meet to be modified if necessary.
Create the Event
This method uses the insert endpoint on the Calendar service. This takes three arguments: your payload, a Google Calendar ID (as a string), and any additional arguments. You can programatically get Calendar IDs, but we only post to one calendar, so I copied/pasted from the account we're using and set it as a variable.
In your Apps Script project, you can now do something like this:
function demo() {
const payload = { ... }
const arg = { "conferenceDataVersion": 1 }
try {
const response = Calendar.Events.insert(payload, "yourCalendarID", args)
console.log(`Success! ${response}`)
} catch(e) {
console.log(`Oh no: ${e.message}`)
}
}
If all goes well, you should now have a calendar event with an attached Meet.
In a Canvas course, you can quickly check the number of missing assignments for single students relatively quickly. You can also message groups of students missing specific assignments from the analytics page (or the gradebook). What you can't do is get a list of all students in a course and their missing assignments in a CSV for quick analysis.
In my never ending exploration of the Canvas API, I've got a Python script that creates a missing assignments report for a course, broken down by section.
What it does
The script uses UCF's canvasapi library to handle all of the endpoints. Make sure to pip install before you try to run the script. The Canvas object makes it easy to pass course and section references around for processing.
Because each student has to be individualy looked up, it uses multiple threads to speed it up. There isn't much compute, just API calls and data wrangling, so multithreading worked better than multiprocessing.
For each section, the script calls for each students' submissions, looking for workflow_state="unsubmitted" specifically to handle filtering on the Canvas servers.
From this filtered list, it creates a final list by checking the submission history and any excused flags. A list is then returned to the main worker and the section is written as a whole to keep the processes thread-safe.
When the script is finished, you'll have a CSV report on your filesystem (in the same directory as the script itself) that you can use.
Improvements
Currently, missing assigments are joined as a single string in the final cell, so those could be broken out into individual columns. I found that the resulting sheet is nicer when the number of columns is consistent, but there could be some additional processing added to sort assignments by name to keep order similar.
Canvas is also implementing GraphQL endpoints so you can request specific bits of data. The REST endpoints are hepful, but you get a lot of data back. Cleaning up the number of bytes of return data will also help it run faster.
While schools are closed, we've moved much of our long term staff development material into Canvas. We have one long-running course with all staff split into site-based sections that has worked as a model for others. We needed a way to essentially duplicate the template course enrollments into new training courses.
Ignorance is bliss (sometimes) and I didn't know of a good way to make this happen. I looked at some of the provisioning reports, but I couldn't select a single course to run a report on. So, I reached for Python and the UCF Open canvasapi library to make it happen.
At the end of this process, I ended with a brand new course, populated with teachers enrolled in their specific sections. I was also able to disable the new registration email and set their course status to active by default.
from config import KEY, URL
from canvasapi import Canvas
template_course_id = ''
new_course_id = ''
canvas = Canvas(URL, KEY)
template_course = canvas.get_course(template_course_id)
new_course = canvas.get_course(new_course_id)
template_sections = template_course.get_sections()
new_sections = [section.name for section in new_course.get_sections()]
for section in template_sections:
enrollments = section.get_enrollments()
if not section.name in new_sections:
print(f'Creating section {section.name}')
new_sections.append(section.name)
course_section = {
"name": section.name,
}
new_section = new_course.create_course_section(course_section=course_section)
count = 0
for enrollment in enrollments:
student = enrollment.user['id']
print(f'Enrolling {enrollment.user["name"]}')
count += 1
args = {
"course_section_id": new_section.id,
"notify": False,
"enrollment_state": "active"
}
try:
new_course.enroll_user(student, "StudentEnrollment", enrollment=args)
except Exception as e:
print(e)
print(f'Enrolled {count} users in {new_section.name}')
It's definitely brute force, but it saved us from having to copy and paste nearly 1,300 users into the new course by hand from a spreadsheet.
Why force enroll at all?
I think this highlights one of the barriers for really taking Canvas to the next level for staff support. There is no good way to enroll non-student users in courses for required development. In our case, it's to fulfill a required training for staff and using Canvas makes sense as a lot is done through application and reflection.
The public course index in Canvas could be used, but without a great way to expose the course to instructional staff only (I know we could use some JavaScript and edit the template, but that's just another thing to manage) it could lead to students joining courses either by accident or maliciously.
We've also toyed around with making a custom self-signup process on an internal website where staff are forwarded directly to the enroll page, but it's another system to manage and another site for teachers to use. The most hands-off approach for all involved is to do something like this in the background as needed to get people where they need to be effectively and efficiently.
tl;dr: The DocuTube addon will be removed from the Marketplace at the end of June, 2020. If you're a programmer and you want to take over ownership of the project, let me know.
Three years ago, I wrote a proof of concept Google Docs app that found YouTube links and displayed videos embedded in a sidebar. It was fun to do and showed some powerful uses of Apps Script in a real way.
I'd made some incremental updates here and there and then worked on a major update over the fall and winter of 2019. During that time, Google updated the platform the code runs on which has been a little hit or miss in terms of usability.
I've had a love/hate relationship with the addon. For instance, it won't work for someone who doesn't have edit rights to the doc. So, what was meant to help teachers and students work effectively isn't a good solution because of the way addons run.
Second, there have been some very strange errors that I have no control over, mainly within Google's app engine. There are service outages and access errors that I cannot prevent or handle well. This has meant frustration for users and for me.
In the end, it showed that Apps Script on it's own can be a great place to build simple utilities that help add functionality and usability to systems. But the fact of the matter is that I cannot solve many of the main issues with DocuTube and I'm at a point where I can't commit more time to it. Rather than leave a buggy, unmaintained app in the Marketplace, I'll be removing it from the store at the end of June once everyone is out of school.
If you're a programmer or hobbyist and you want to take up maintenance, get in touch because I'd be happy to transfer the codebase over to you and you can republish with all the same assets if you'd like.
If you were a user, thanks. If you wrote a review, thanks. If you've never heard of it, not a big deal.
This is a technical post. Read on for code and commentary.
In moving to online, we've tried to streamline all of our communication through Canvas. The goal is to cut down on disconnected email threads and encourage students to use submission comments to keep questions and feedback in context.
The Problem
Many students had already turned off email notifications for most communications in Canvas, preferring not to have any notices, which reduces their responsibility for teacher prompting and revision. Notifications are a user setting and the Canvas admin panel doesn't provide a way to define a default set of notification levels for users. However, with the API, we were able to write a Python program that sets notification prefs by combining the as_user_id query param as an admin that sets user notification preferences.
API Endpoints
- GET user communication channel IDs: /api/v1/users/:user_id/communication_channels
- PUT channel preferences for user: api/v1/users/self/communication_channels/{channel_id}/notification_preferences/{msg_type}
Params
- Int user_id
- Int channel_id
- String frequency
Get User IDs
There is no easy way to programmatically get user IDs at the account or subaccount levels without looping each course and pulling enrollments. Instead, we opted to pull a CSV of all enrollments using the Provisioning report through the Admin panel. We configured separate files using the current term as the filter. This CSV included teacher, student, and observer roles. The script limits the notification updates to student enrollments.
Script Details
The full program is available in a GitHub gist. Here is an annotated look at the core functions.
main handles the overall process in a multi-threaded context. We explicitly define a number of workers in the thread pool because the script would hang without a defined number. Five seemed to work consistently and ran 1500 records (a single subaccount) in about 7 minutes.
The CSV includes all enrollments for each student ID, so we created a set to isolate a unique list of student account IDs (lines 9-10 below).
To track progress, we wrapped the set in tqdm. This prints a status bar in the terminal while the process is running which shows the number of processed records out of the total length. This is not part of the standard library, so it needs to be installed from PyPI before you can import it.
def main():
    """
    Update Canvas user notification preferences as an admin.
    """
    unique = set()
    data = []
    with open('your.csv', 'r') as inp:
        for row in csv.reader(inp):
            if re.search("student", row[4]):
                unique.add(int(row[2]))

    with concurrent.futures.ThreadPoolExecutor(max_workers=5) as executor:
        with tqdm(total=len(unique)) as progress:
            futures = []
            for student in unique:
                future = executor.submit(process_student_id, student)
                future.add_done_callback(lambda p: progress.update())
                futures.append(future)
            results = [future.result() for future in futures
process_student_id is called by the context manager for each student ID in the set. Canvas breaks communication methods into "channels:" email, push, Twitter, etc (line 3). Each channel has a unique ID for each user, so we needed to call each user's communication channels and then pass the ID for emails to a setter function.
def process_student_id(student):
channel_id = get_channel_id(student)
try:
update = update_prefs(student, channel_id)
return update
except Exception as e:
print(e)
GET communication_channels
def get_channel_id(student_id):
url = f"https://yourURL.instructure.com/api/v1/users/{student_id}/communication_channels"
resp = requests.request("GET", url, headers=headers)
for channel in resp.json():
if channel['type'] == 'email':
return channel['id']
PUT communication_channels/:channel_id/notification_preferences/:message_type[frequency]
The communication channel can receive several types of communications. We wanted to set the student notifications to "immediately" for new announcements, submission comments, and conversation messages. You can define others as well as their frequencies by modifying the values on lines 3-4.
The communication types are not well documented, so we used our own channel preferences to find the notification strings: GET /users/self/communication_channels/:channel_id/notification_preferences.
The crux of this step is to make the request using the Masquerading query param available to the calling user. Make sure the account which generated the API key can masquerade or else the script will return an unauthorized error.
def update_prefs(student_id, channel_id):
types = ["new_announcement", "submission_comment", "conversation_message"]
frequency = "immediately"
responses = []
for msg_type in types:
url = f"https://elkhart.test.instructure.com/api/v1/users/self/communication_channels/{channel_id}/notification_preferences/{msg_type}?as_user_id={student_id}¬ification_preferences[frequency]={frequency}"
resp = requests.request("PUT", url, headers=headers)
responses.append(resp)
return responses
Final Thoughts
Updating a user's personal preferences isn't something I was thrilled about doing, but given our current circumstances, it was preferable to the alternative of continuing to struggle to help students move forward in their coursework. Further improvements would be to call each CSV in the file system incrementally, cutting down on the time someone has to log in and run the script. Hopefully, this only needs to be done once and does not become a recurring task.
Second, there is an endpoint in the API to update multiple communication preferences at once, but it isn't well documented and I wasn't able to get it working reliably. For just one channel and three specific types of messages, the performance improvements probably would have been negligible (at least that's what I'm telling myself).
I started a small project to clean up my personal photo hosting. I'm currently using an app written in PHP, but it's way over my head and does way more than I want or need. So, I'm taking this opportunity to roll my own backend API for photo storage and serving.
I'm building it in Flask and using the Flask-RESTful extension to help with routing, HTTP methods, and overall structure. I'm hoping that if I have a functional backend, I can learn a frontend framework like Vue in a more formal way.
It's nothing fancy, but the bones are starting to grow a little here and there. Right now, I have it returning all references in a database as well as querying by ID directly. Next, I'm going to add some methods to update the photo title and then I'll move on to uploading files directly.
Source code is in GitHub if you want to look. No pretty pictures because all it serves right now is data.
I just finished packing up our first house, to be put on the market tomrorow morning after living here for eight years. As I moved from room to room making small repairs this morning, I thought back on the time, sweat, and energy we've poured into it.
We bought the house after ignoring it for months because the outside was...interesting. My father-in-law convinced us to pull over and look into windows. That's the first time we met the neighbor, Dan, who with his wife Vicki, are the best neighbors in the world.
Yes, they're better than your neighbors. I will die on this hill.
All four of our kids were born in this house. My wife's family lived down the road and my parents were able to come and stay with us every couple of months. The neighbors became adopted grandparents by all of the kids. Small group meetings, brothers driving through, visits with cousins and other friends happened here. Our lives were shared in these rooms.
Sometimes there just isn't enough room on the couch.
This is about a year before the latest baby was born in June 2019
Since living here, I've learned how to frame, tile, plumb, and do my own drywall and electrical. I've installed a septic system. I've converted the house from electric heat to a gas furnace. We took a large bedroom and made it into two. Both bathrooms have had remakes...and those are just the large projects.
Plumbing an entire bathroom by myself was terrifying. So terrifying that I installed the shower mount upside down to remind myself to let things go. The shower still works.
Repairing a septic field isn't hard, necessarily, but it's a huge task.
I never would have imagined learning how to do all of those things (with my father-in-law's help) and now I can't imaging not having learned those things.
Lindsey's dad (in grey) is a contractor and taught me 99% of what I've learned in the last eight years.
The spring brought new planing and the summers were full of wild raspberries, vegetables from the garden, and more recently, armloads of cosmos, ranunculus, and roses.
We watched the bats wake up during dusk and wondered how loud the cicadas could get during the day.
These things won't stop. I'm pretty sure cicadas live in Michigan, too.
These guys look way meaner than they actually are.
But all of these things happened for the first time here. At Quince House.
It really hit me that we're leaving when I took the swings out of the tree. I can't bring the house, but some parts of it are coming with us.
This is where the new house will stand in the fall of 2020.
We'll be building our next house on a plot of land adjacent to my brother-in-law's farm. We'll be able to wake up and see the cattle out back along the treeline. We're planning on building a hiking trail from our land to theirs so the cousins can visit whenever they want.
There will still be joy. There will still be disappointment and growing.
Quince House got us started.
The featured photo is of my backyard, early 2020.

I was given a good challenge by our secondary curriculum coordinator a couple weeks back. He wanted to know how we get in front of standards-based grading being reduced to collections of isolated skills. In other words, we're doing well tracking our essential standards over time, but those are more or less in isolation (not taking into account any spiralling or scaffolding happening).
File this under stream-of-consciousness rambles. I have three thoughts percolating:
- Curriculum is skills, knowledge, and dispositions. It seems that performance tasks should focus on skills and dispositions more than content because they're the "connective tissue," as it were, to context outside of the classroom.
- Some kind of measurement tool is needed, but what is the scope? Is it defined by the district? Or are those skills and dispositions different based on content area? Or even by classroom?
- Showing application or transfer of information is difficult because you have to make something novel rather than simply report on learning.
In terms of how to do this...well, I haven't quite made it there yet. I have a feeling that this would be a good place for a single point rubric (because those are the new ??? right now) because ofo the flexibility they provide.
Another tack would be to write new performance standards which combine the individual standards, but that's another level of organization to add on top of unpacking the current content material. It could work with a larger group together at the district level, but consensus becomes the challenge.
If you're a teacher using SBG, what thoughts do you have? How do you make sure students are forming holistic understanding and not simply accruing a collection of ideas?


I am trying to do the same with Notion API in Google App Script, querying a database of more than 100 items.
In the requests they provide a start_cursor and in the response a has_more boolean value letting you know there is more data as well as a next_cursor parameter that you can use to retrieve the next page of results by passing the value as the start_cursor parameter to the same endpoint.
i just started learning about APIs and don’t really know how to structure this particular example. So far i have code working without any pagination so a hard limit of 100 items.
Do you have any pointers on how to do this or an example?